DoubleClick Floodlight
In this section you will learn:
- How to turn DoubleClick Floodlight on or off on your website.
- How to send event tracking information to DoubleClick Floodlight.
- How to pass custom variables to DoubleClick Floodlight.
The DoubleClick Floodlight integration is used for sending activity and conversion data from your website to the Google Campaign Manager.
Page contents
Introduction
Through SegmentStream you can integrate DoubleClick Floodlight in a couple of clicks.
To configure your integration with DoubleClick Floodlight:
- Login on the segmentstream.com website.
- Enter the “Integration” tab and click on the block with the DoubleClick Floodlight logo.
- In the panel that opens, configure the integration.
The tracking of each event in DoubleClick requires the filling of a list of settings.
Floodlight configuration ID
The Floodlight Configuration ID is a unique Google Campaign Manager identifier, it can be found on the ‘All Counters’ page in your Campaign Manager account. For more information, visit the Google help page.
Event name
This field should be filled with the name of the digitalData event that triggers the activity tag tracked. For more information on digitalData events visit our events documentation page.
Activity group tag string
The Floodlight activity group tag string is the name of the container for the tracked Floodlight activity. For more information, visit the Floodlight activity group help page.
Activity tag string
The Floodlight activity tag string is the name of the tracked Floodlight activity. For more information, visit the Floodlight Counter tags help page.
Counting method
Select one of the two conversion counting methods:
- ‘Standard’ if you need to count the number of conversions associated with an event.
- ‘Transactions’ if you need to track the number of sales made or the number of items purchased. For more information, visit the Floodlight conversion counting methods help page.
Custom variables
DoubleClick Floodlight allows you to pass any parameter to the tracked activity tag. For more information, visit the Floodlight custom variables help page.
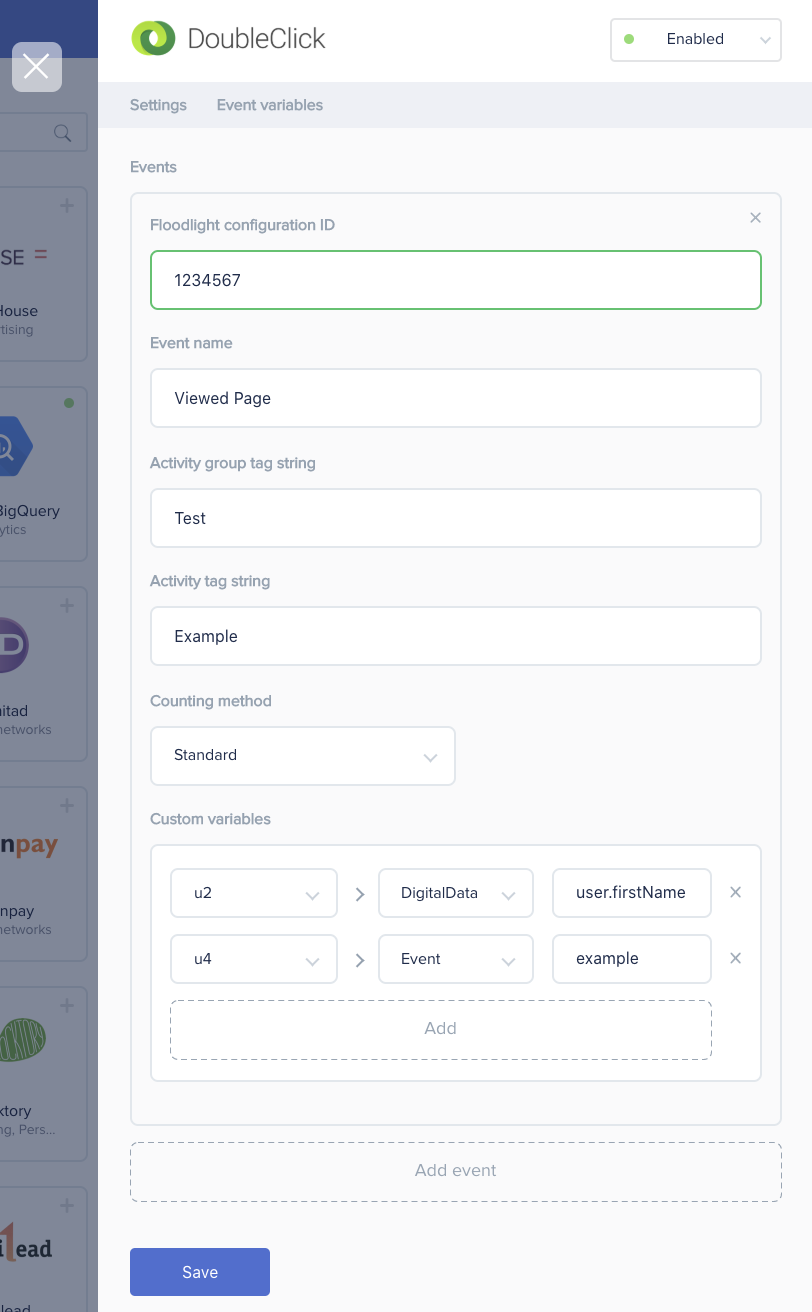
To configure the transfer of a parameter, you have to fill in 3 fields:
- Left - In the drop-down list, select the custom variable number (u1, u2, and so on) that you want to pass the parameter to.
- Center - Specify the data source:
- DigitalData. Any variable that is present in the digitalData object
- Event. A variable that is present in the digitalData event that triggers the activity tag.
- Right - Specify the name of the variable.
In the screenshot above are two examples of usage:
- The
u2custom variable is receiving the value of theuser.firstNamedigitalData variable. - The
u4custom variable is receiving the value of theexampleViewed Page event variable.
If the digitalData.user object is filled, and the Viewed Page event is pushed as in the example below, the u2 and u4 custom variables will receive the John and test example values respectively.
window.digitalData = {
    user: {
      userId:'125',
      firstName:'John'
    }
    // ...other digitalData data
};
window.digitalData.events.push({
    name: 'Viewed Page',
    example: 'test example'
});