Quick Start guide
Snippet deployment
The SegmentStream container snippet is a small piece of JavaScript code that you paste into your pages. It enables SegmentStream to fire events by inserting segmentstream.js into the page.
To implement SegmentStream on your website:
Copy the following JavaScript and paste it as close to the opening <head> tag as possible on every page of your website, replacing <PROJECT_ID> with your project ID, or open the “Project Info” menu in the desired project’s admin panel, and copy the prepared code.
<!-- SegmentStream snippet -->
<script type="text/javascript">
(function(h,d){d=d||"cdn.segmentstream.com";var a=window.segmentstream=window.segmentstream||[];window.ddListener=window.ddListener||[];var b=window.digitalData=window.digitalData||{};b.events=b.events||[];b.changes=b.changes||[];if(!a.initialize)if(a.invoked)window.console&&console.error&&console.error("SegmentStream snippet included twice.");else{a.invoked=!0;a.methods="initialize addIntegration persist unpersist on once off getConsent setConsent".split(" ");a.factory=function(k){return function(){var c=
Array.prototype.slice.call(arguments);c.unshift(k);a.push(c);return a}};for(b=0;b<a.methods.length;b++){var f=a.methods[b];a[f]=a.factory(f)}a.load=function(a){var c=document.createElement("script");c.type="text/javascript";c.charset="utf-8";c.async=!0;c.src=a;a=document.getElementsByTagName("script")[0];a.parentNode.insertBefore(c,a)};a.loadProject=function(b){var c=window.location.search;if(0<=c.indexOf("segmentstream_test_mode=1"))try{var e=!0;window.localStorage.setItem("_segmentstream_test_mode",
"1")}catch(g){}else if(0<=c.indexOf("segmentstream_test_mode=0"))try{e=!1,window.localStorage.removeItem("_segmentstream_test_mode")}catch(g){}else try{e="1"===window.localStorage.getItem("_segmentstream_test_mode")}catch(g){}e?a.load(window.SEGMENTSTREAM_TESTMODE_INIT_URL||"https://api.segmentstream.com/v1/project/"+b+".js"):a.load(window.SEGMENTSTREAM_INIT_URL||"https://"+d+"/project/"+b+".js")};a.CDN_DOMAIN=d;a.SNIPPET_VERSION="2.0.0";a.loadProject(h)}})("<PROJECT_ID>");
</script>
<!-- //SegmentStream snippet -->
A lot of data can be collected by just doing the basic code installation:
- Viewed pages
- Traffic sources
- Information about the browser, ip, screen resolution
- etc
Connecting Google BigQuery data warehouse
-
Follow this guide to setup Google BigQuery integration.
-
Go to your website and visit a few pages.
-
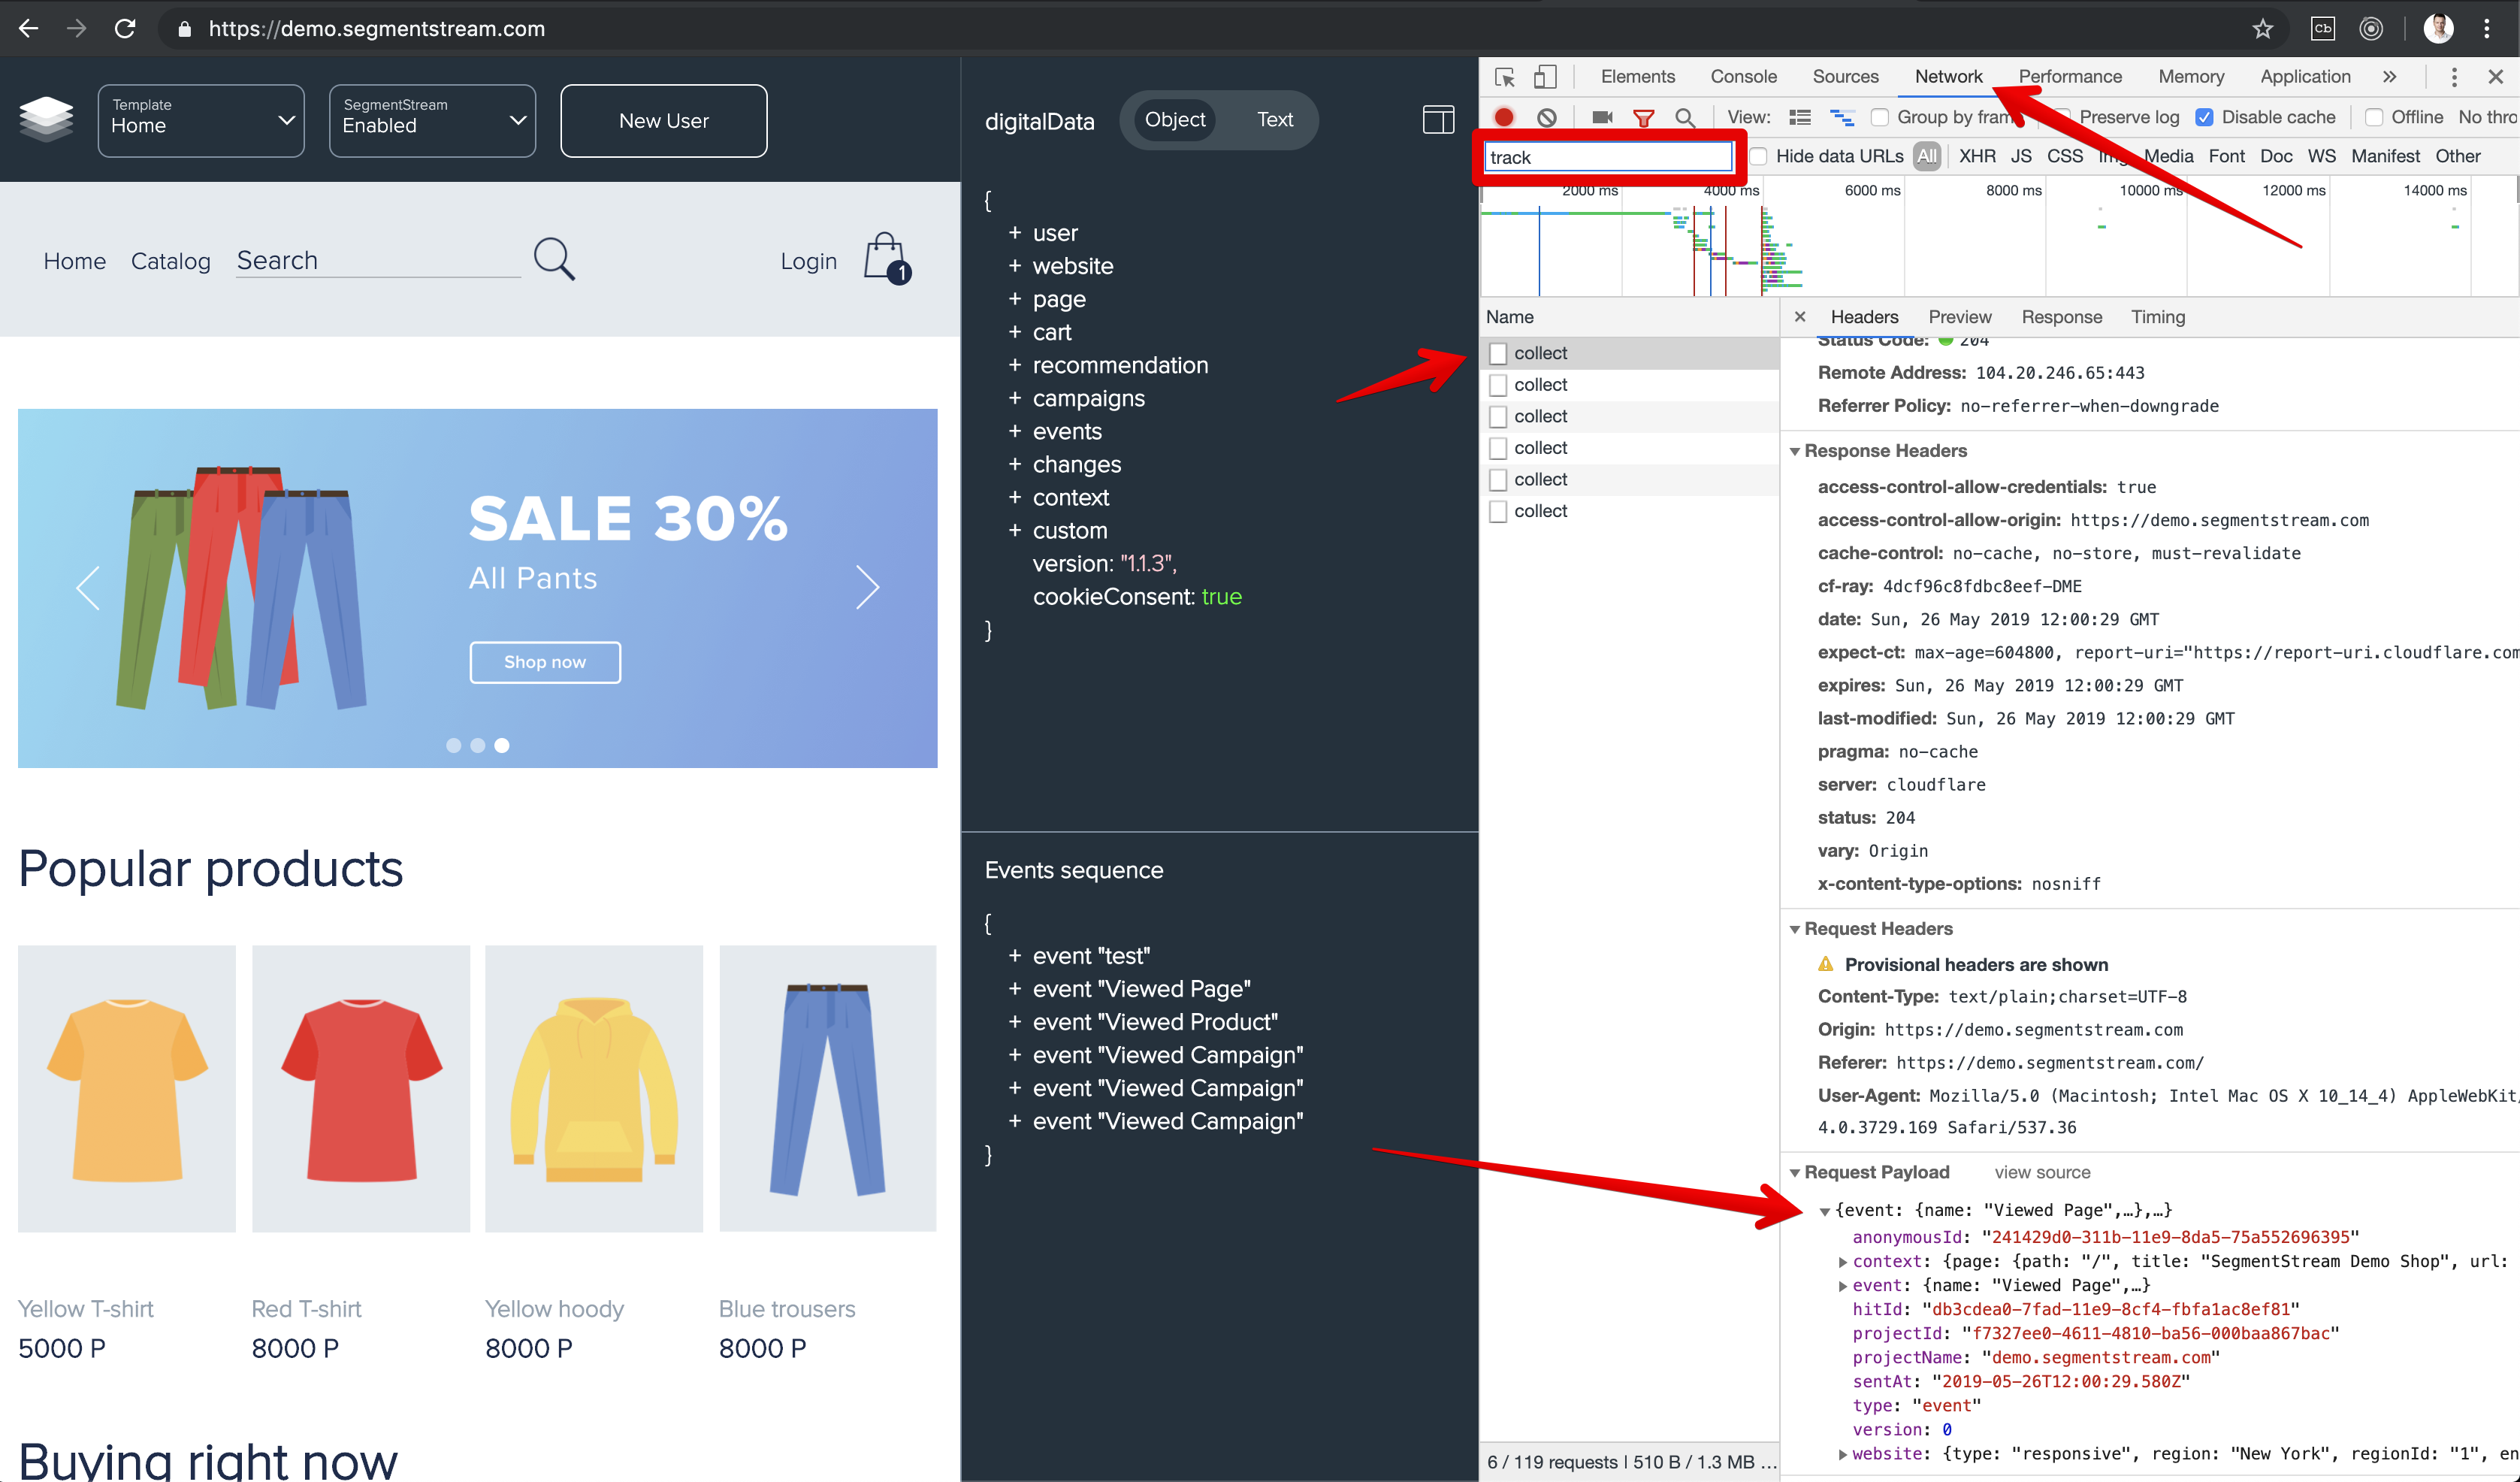
Make sure that data is collected in the Chrome browser console:
-
Go to the Google Cloud Platform and check whether the new
hits_YYYYMMDDtable was created in you Google BigQuery Console: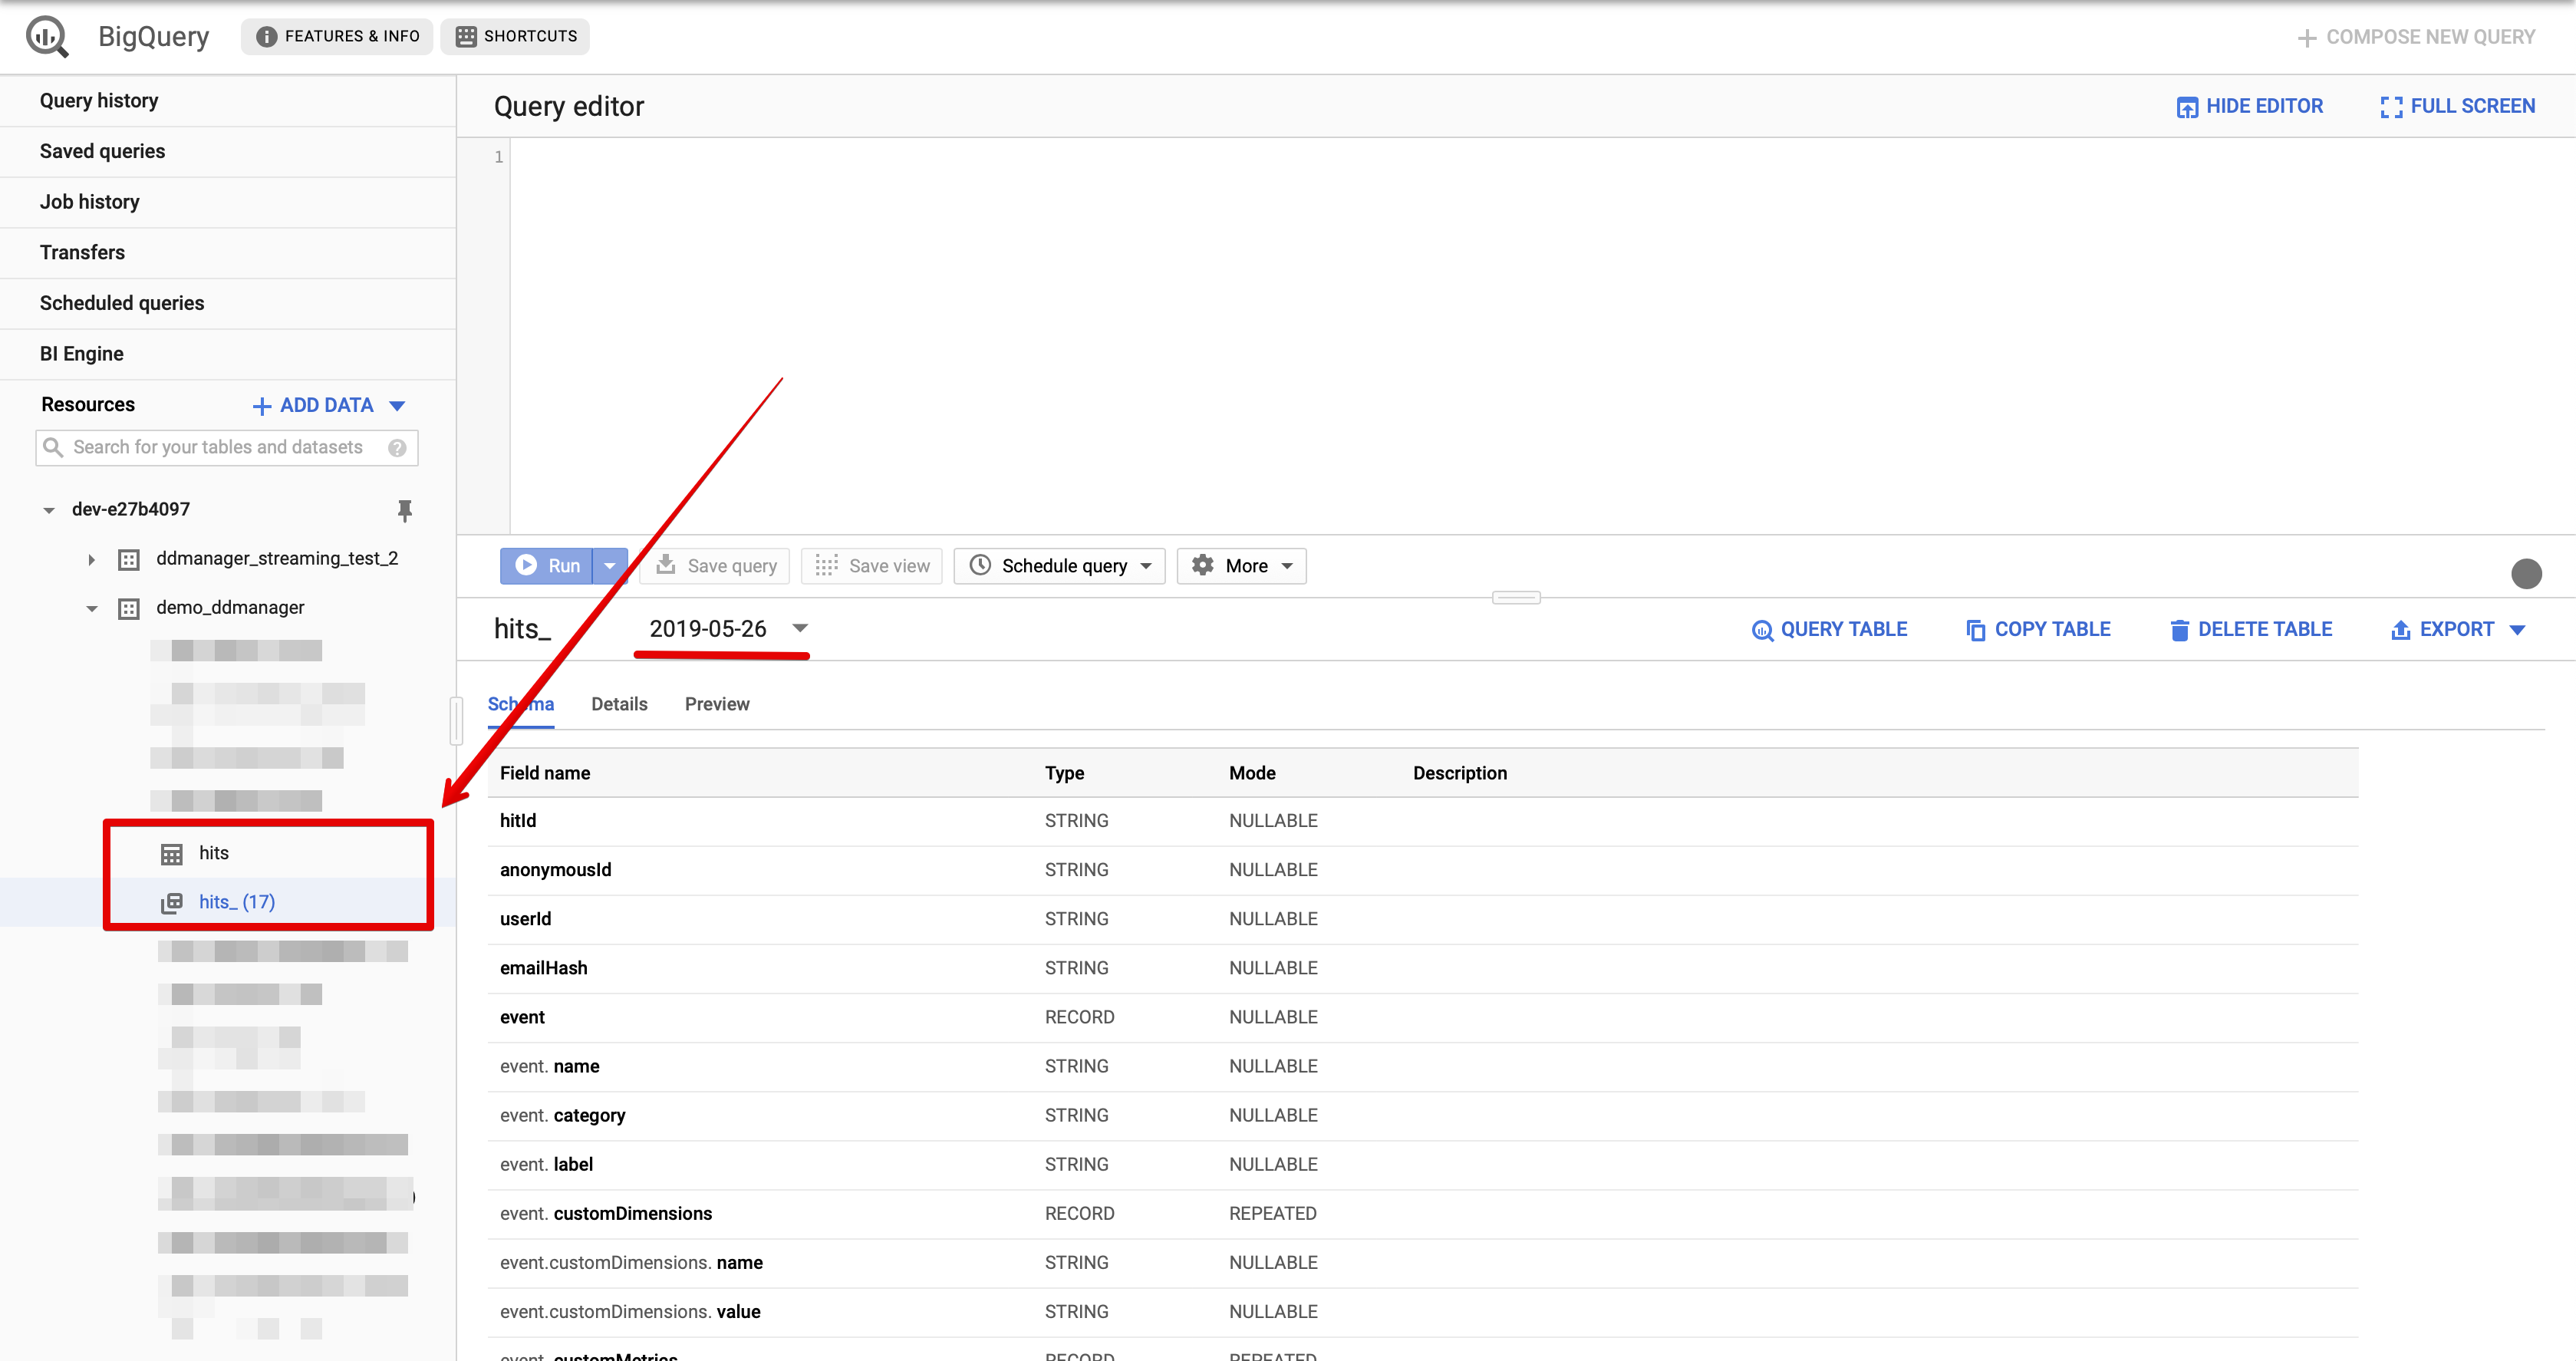 Note, that there are actually 2 hits tables were created:
 hitsandhits_YYYYMMDD. First one is just a template that keeps the schema and used to create daily hits tables. -
Click on the
hits_YYYYMMDDtable and then on the “Query Table” button: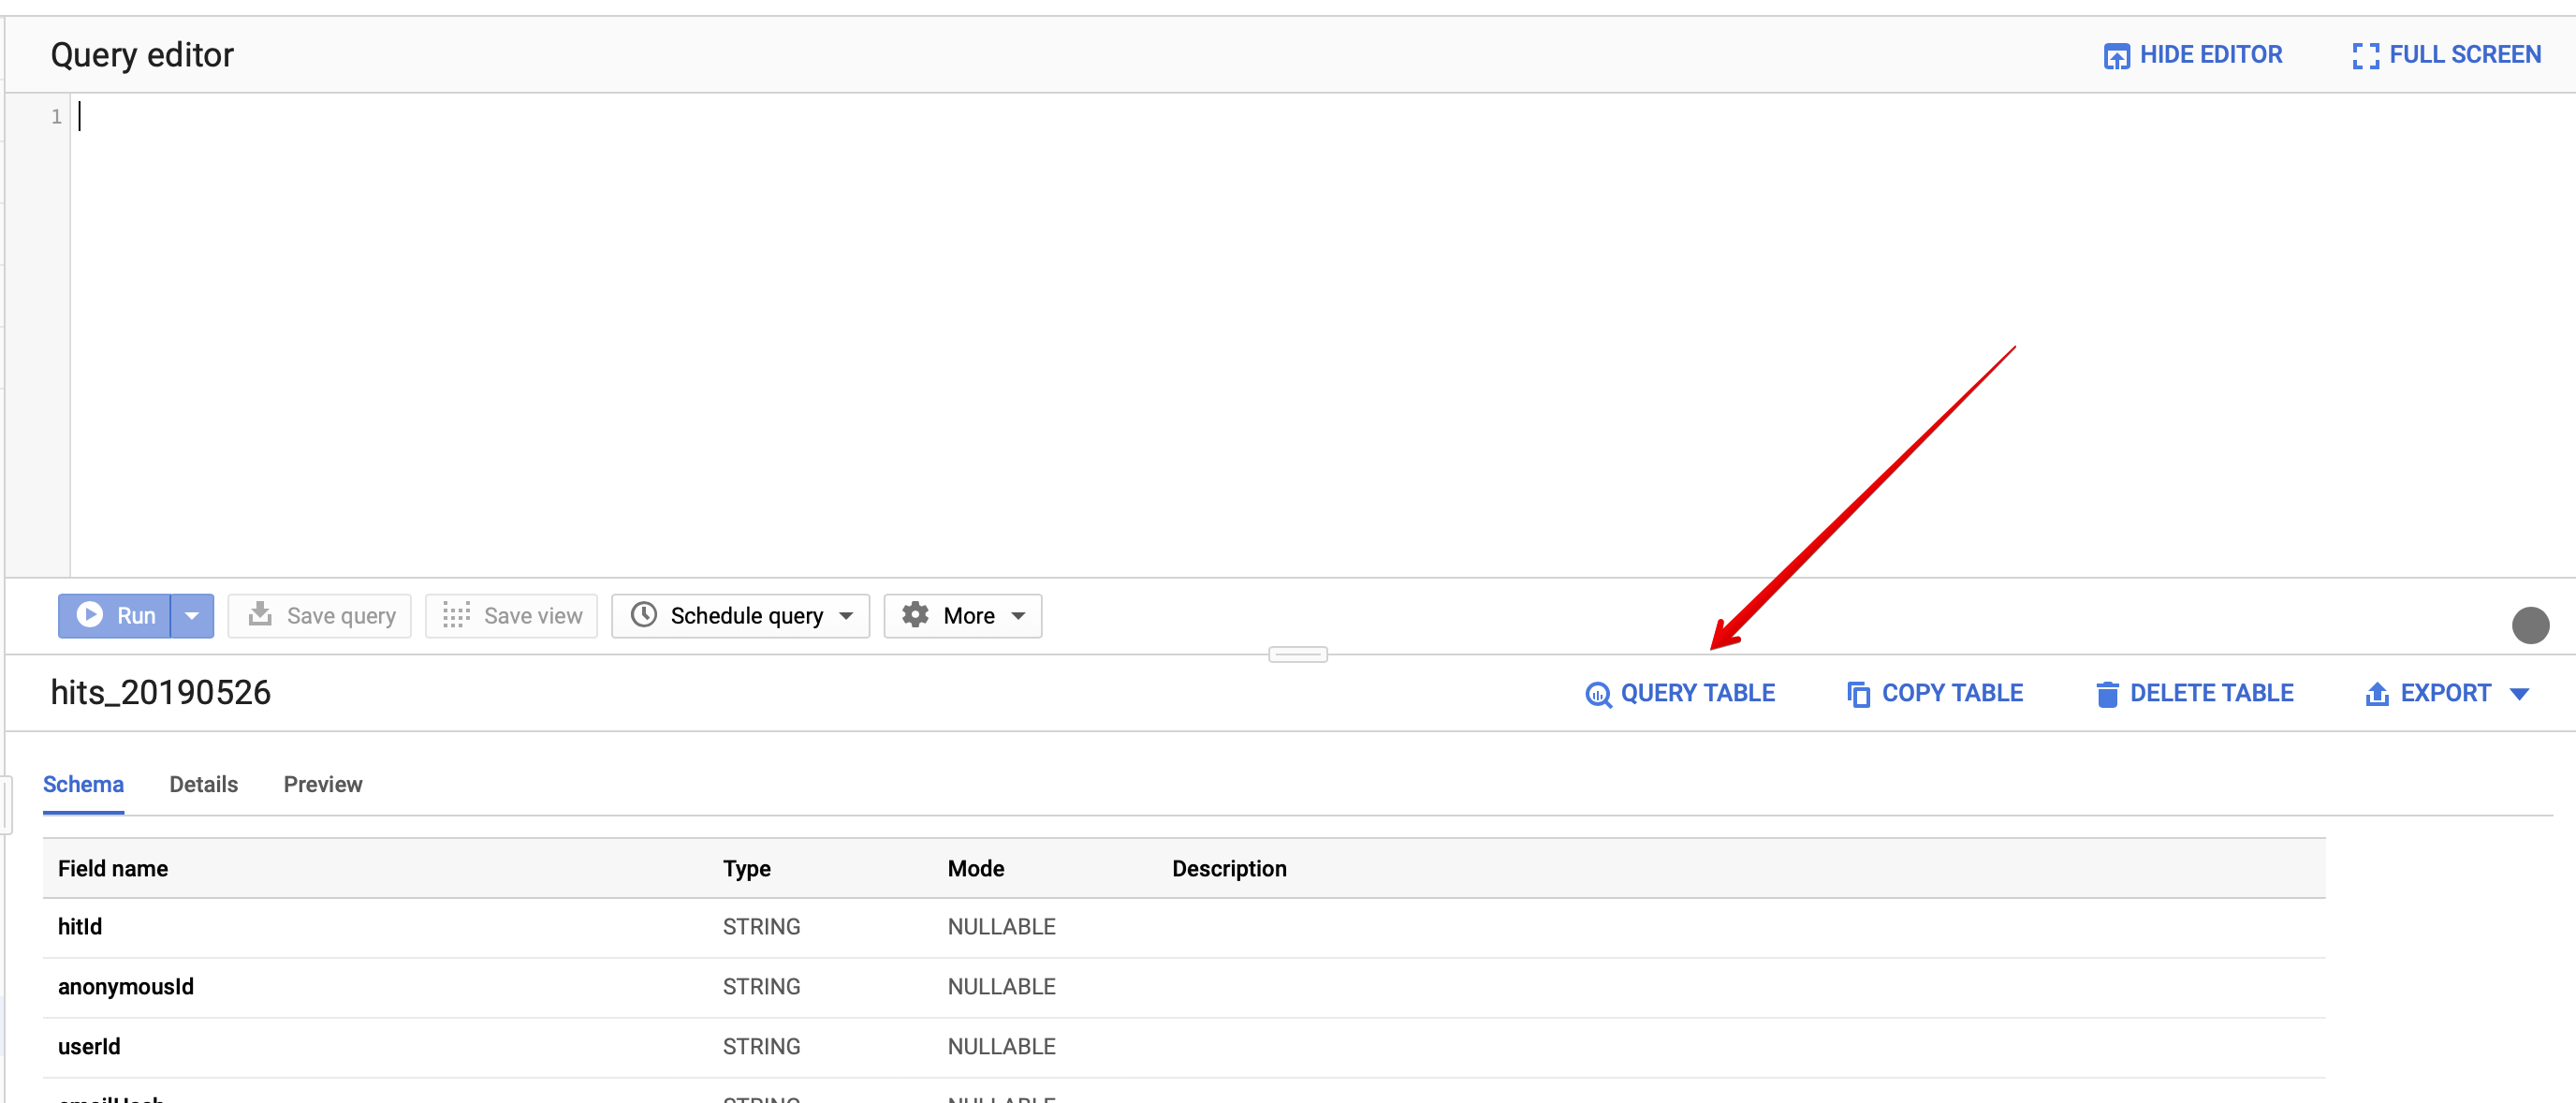
- Run the following query in the Query editor:
SELECT hitId, event.name, context FROM `<FULL_TABLE_NAME>`Note, that you should use proper full table name which is automatically filled once you click “Query Table” button.
- If everything was set up properly you will see results about pageviews from your website:
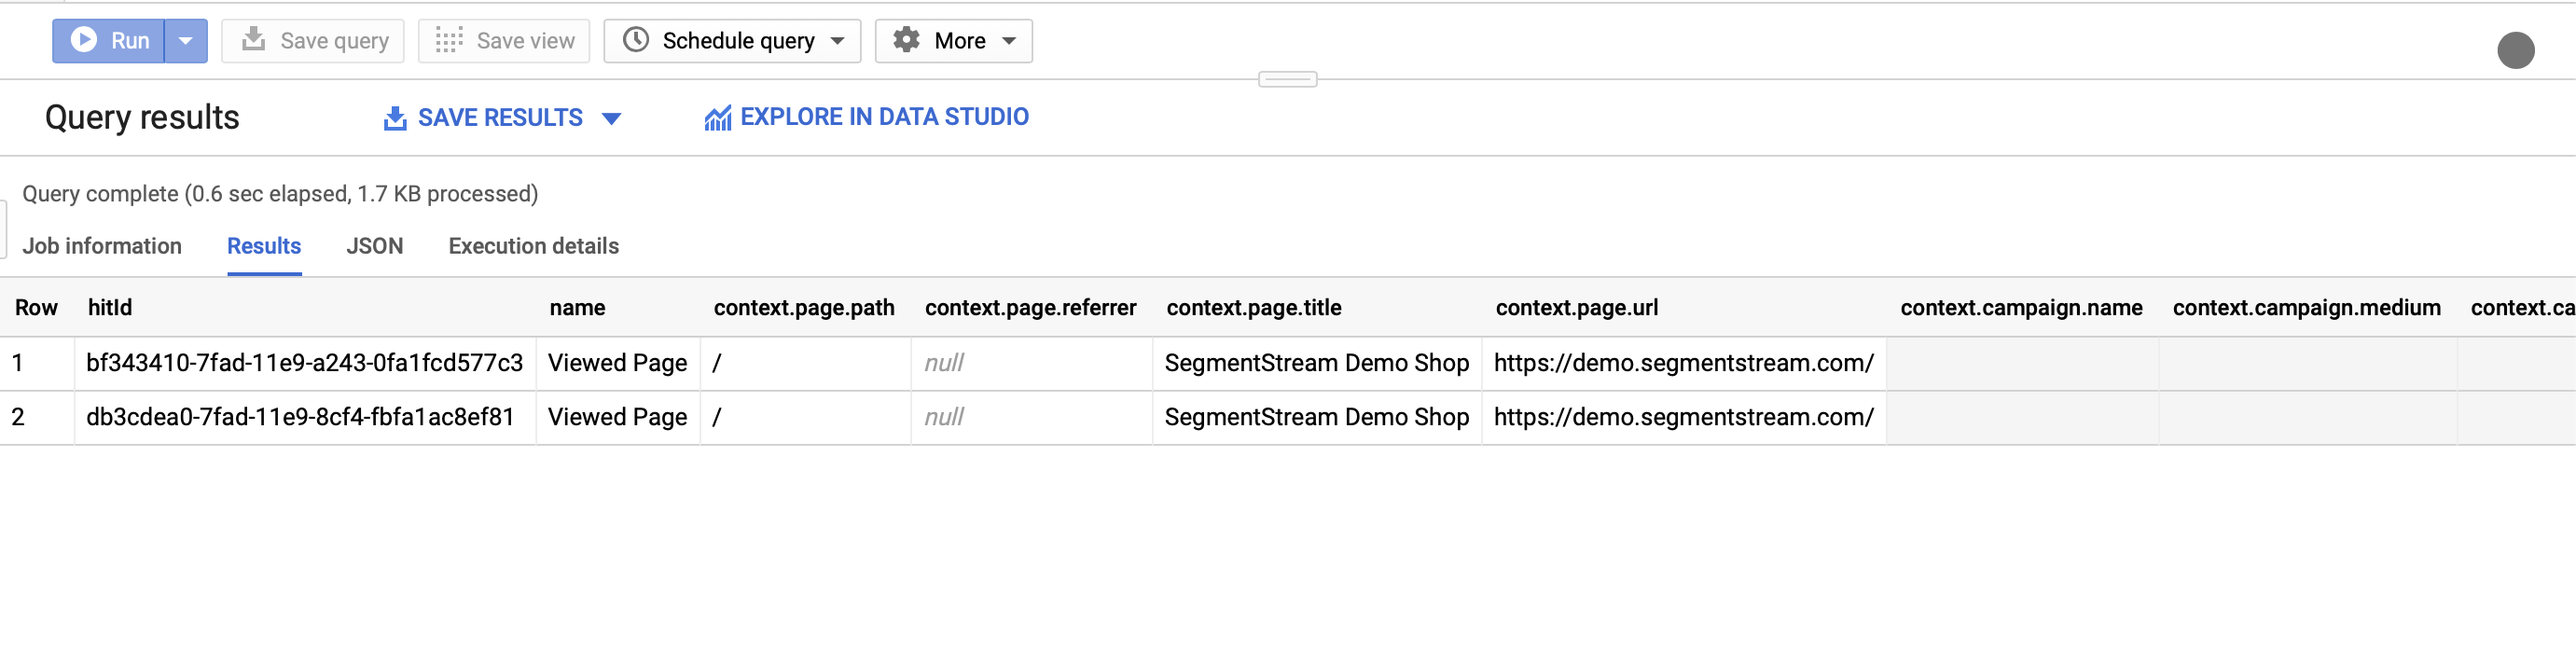
Great! Now you’ve set up a real-time collection of all page views on your website.
Advanced events tracking
Let’s imagine you have an e-commerce website and would like to track all user transactions. Of cause, this should be properly set up by developers but for the purpose of this quick guide let’s send a “fake” transaction.
- Open Chome browser console and copy-paste the following code:
digitalData.events.push({
  category: 'Ecommerce',
  name: 'Completed Transaction',
  transaction: {
 orderId: "QA-123456",
 currency: "USD",
 subtotal: 310,
 shippingCost: 10,
 shippingMethod: "Delivery",
 total: 320,
 lineItems: [
   {
     product: {
       id: "1234567890",
       name: "Timberland shoes",
       manufacturer: "Timberland",
       category: ["Shoes","Boots"],
       currency: "USD",
       unitPrice: 150,
       unitSalePrice: 110,
       skuCode: "TBL6065RW",
     },
     quantity: 2,
     subtotal: 220
   },
   {
     product: {
       id: "54563454",
       name: "Nike shoes",
       manufacturer: "Nike",
       category: ["Shoes","Sport"],
       currency: "USD",
       unitPrice: 120,
       unitSalePrice: 90,
       skuCode: "TBL6065ZX",
     },
     quantity: 1,
     subtotal: 90
   }
 ]
  }
});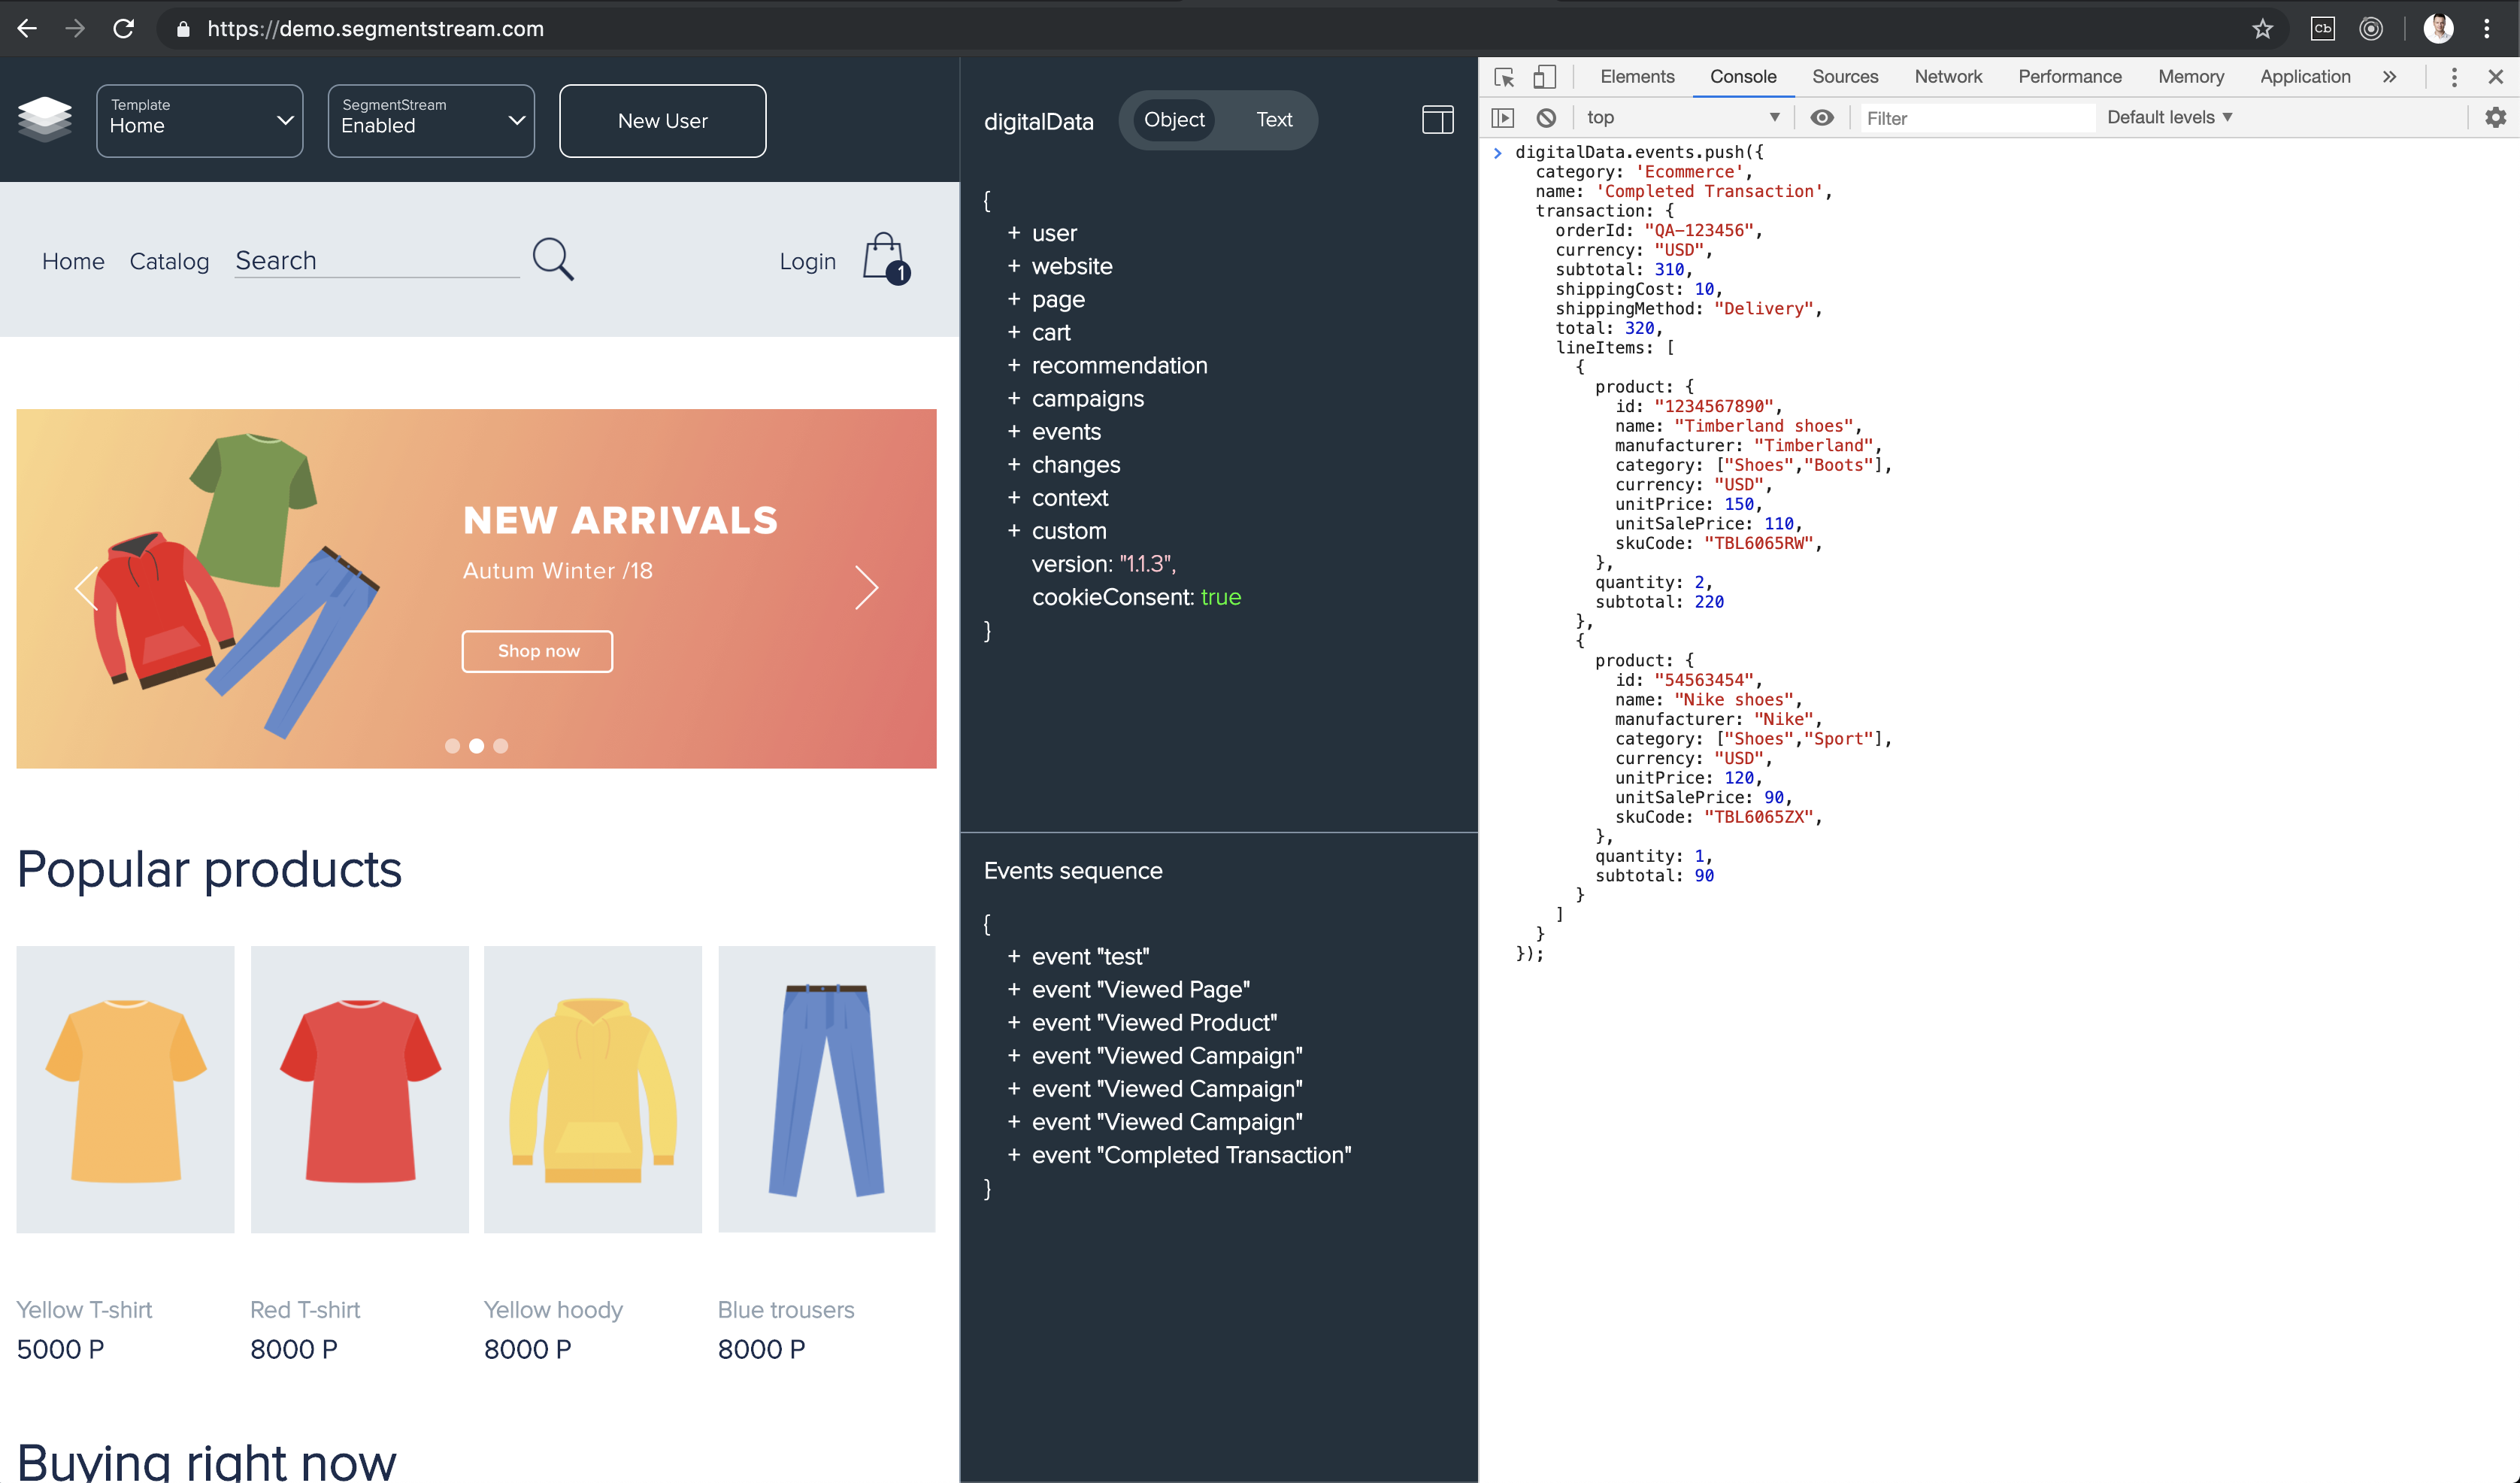
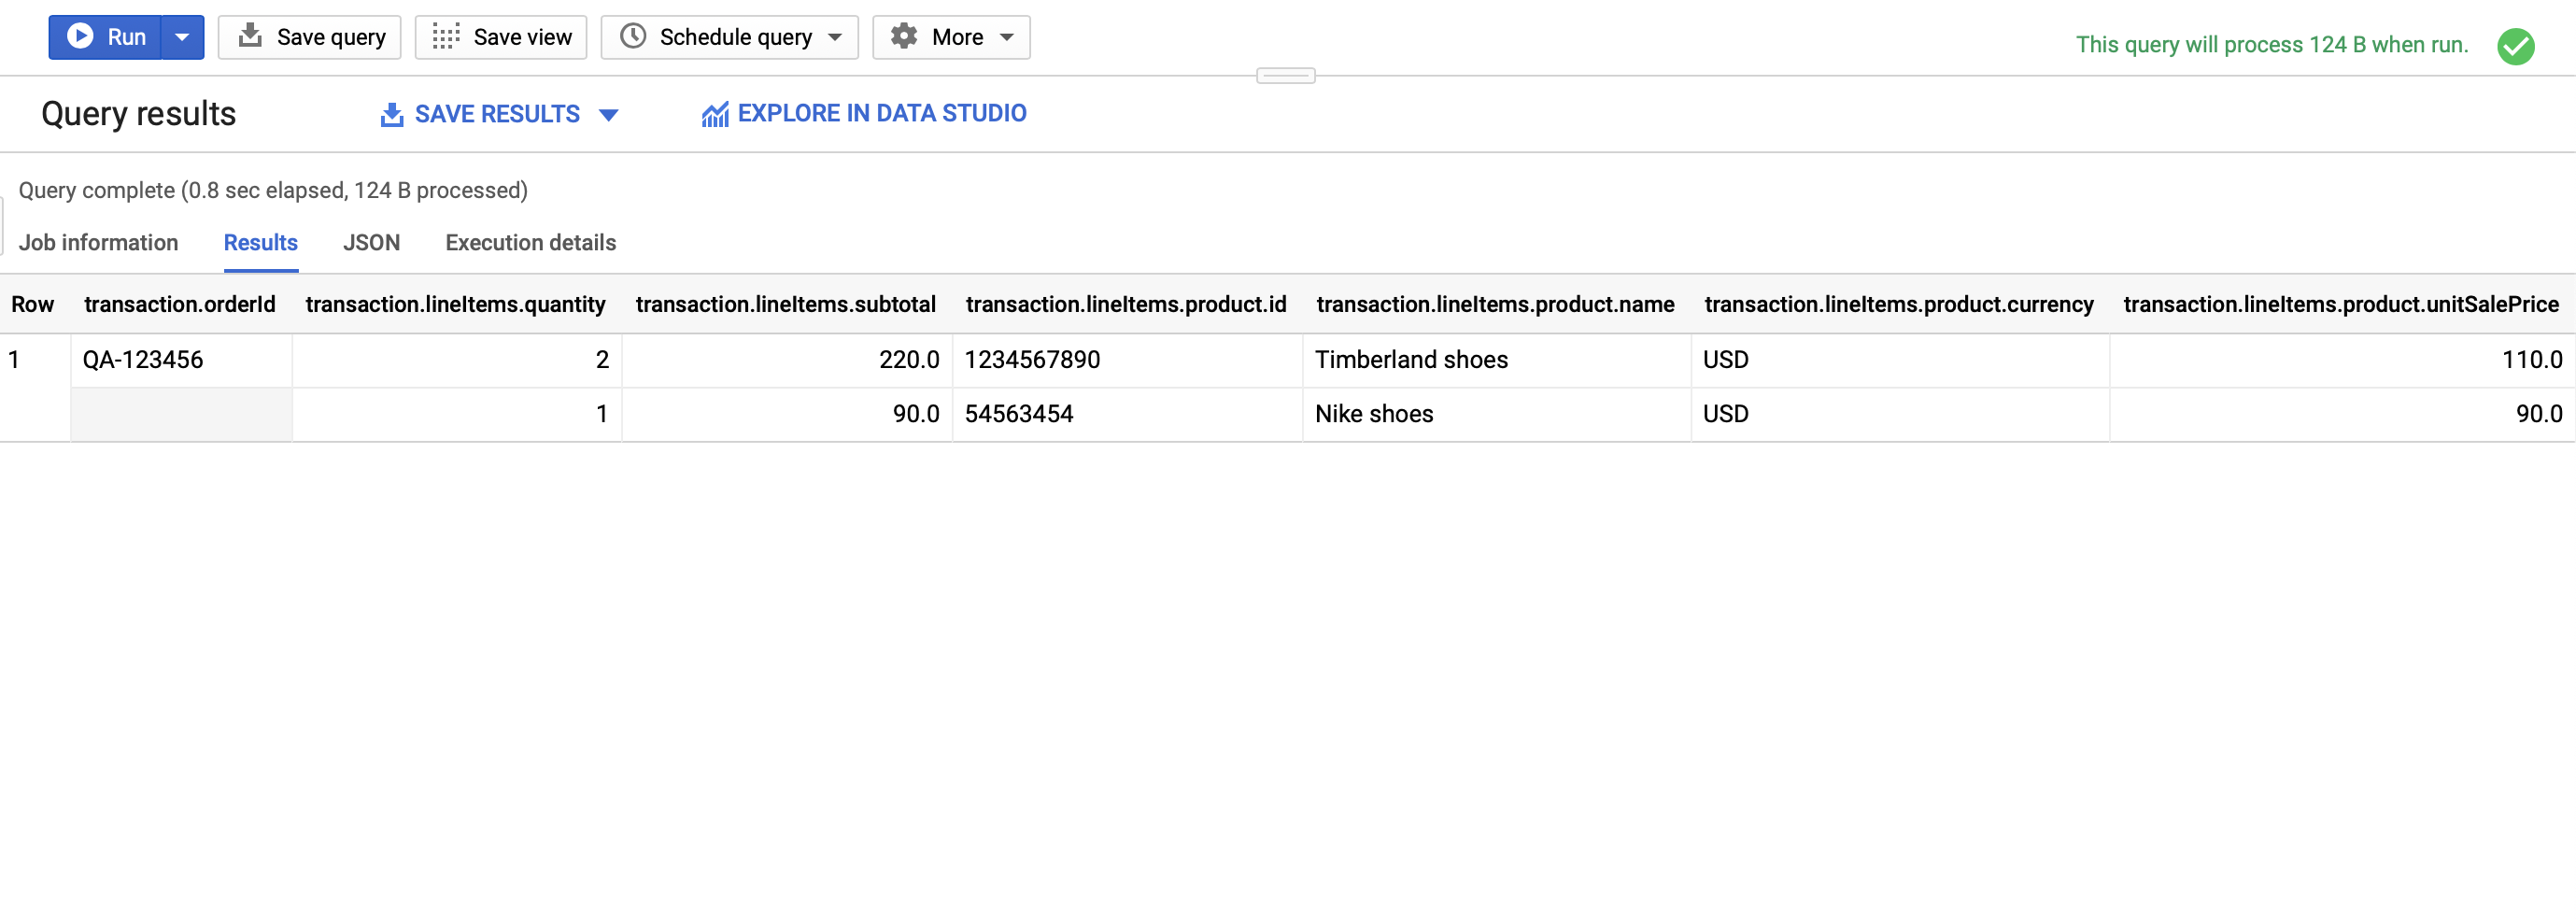
- Go back to the Google BigQuery console, click on
hits_YYYYMMDDtable and again click on “Query Table” button. At this time let’s select all tracked transactions using the following query:SELECT event.transaction FROM `<FULL_TABLE_NAME>` WHERE event.name = "Completed Transaction"Again, don’t forget to replace
<FULL_TABLE_NAME>with your proper full table name. - You should observe similar results:
Behavioral events tracking
Finally, let’s try to set up tracking of a behavioral event, such as click.
-
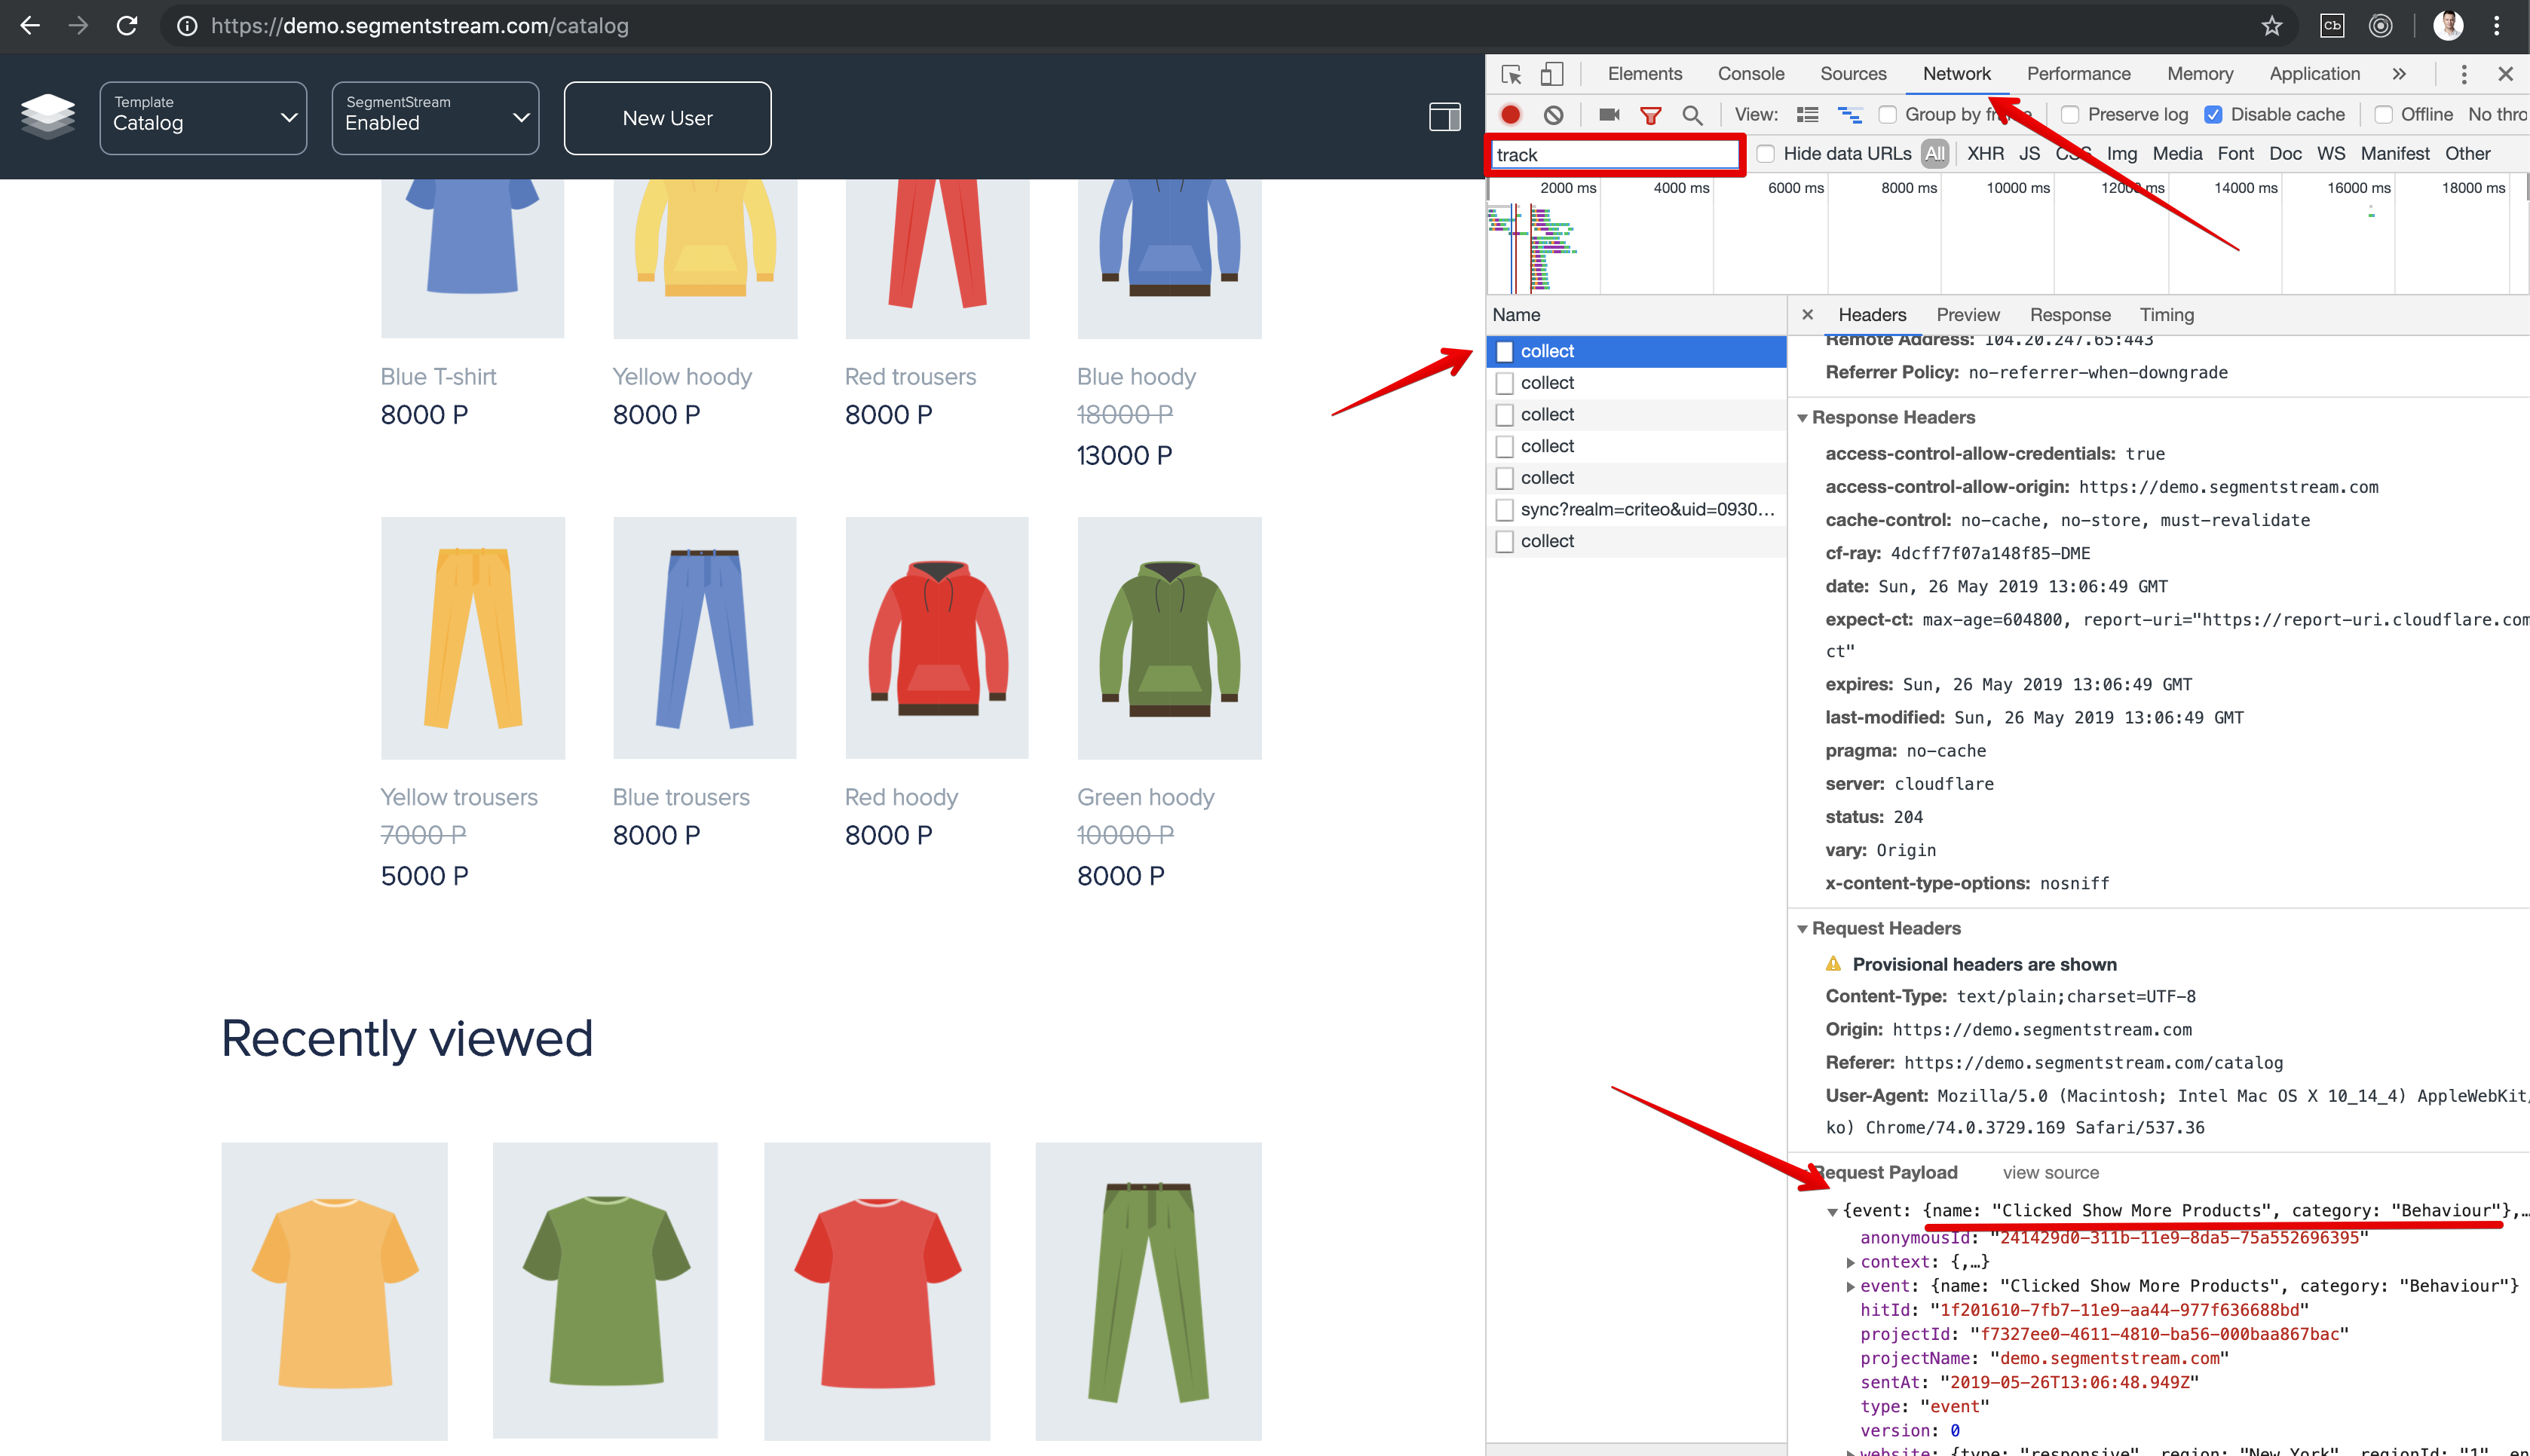
Firstly, you need to figure out the CSS selector of the element you would like to track. It can be easily done using Google Chrome’s console. In the example below, the CSS selector of the “Show more products” button is the
.moreProductsbecause the element has a CSS classmorePoducts.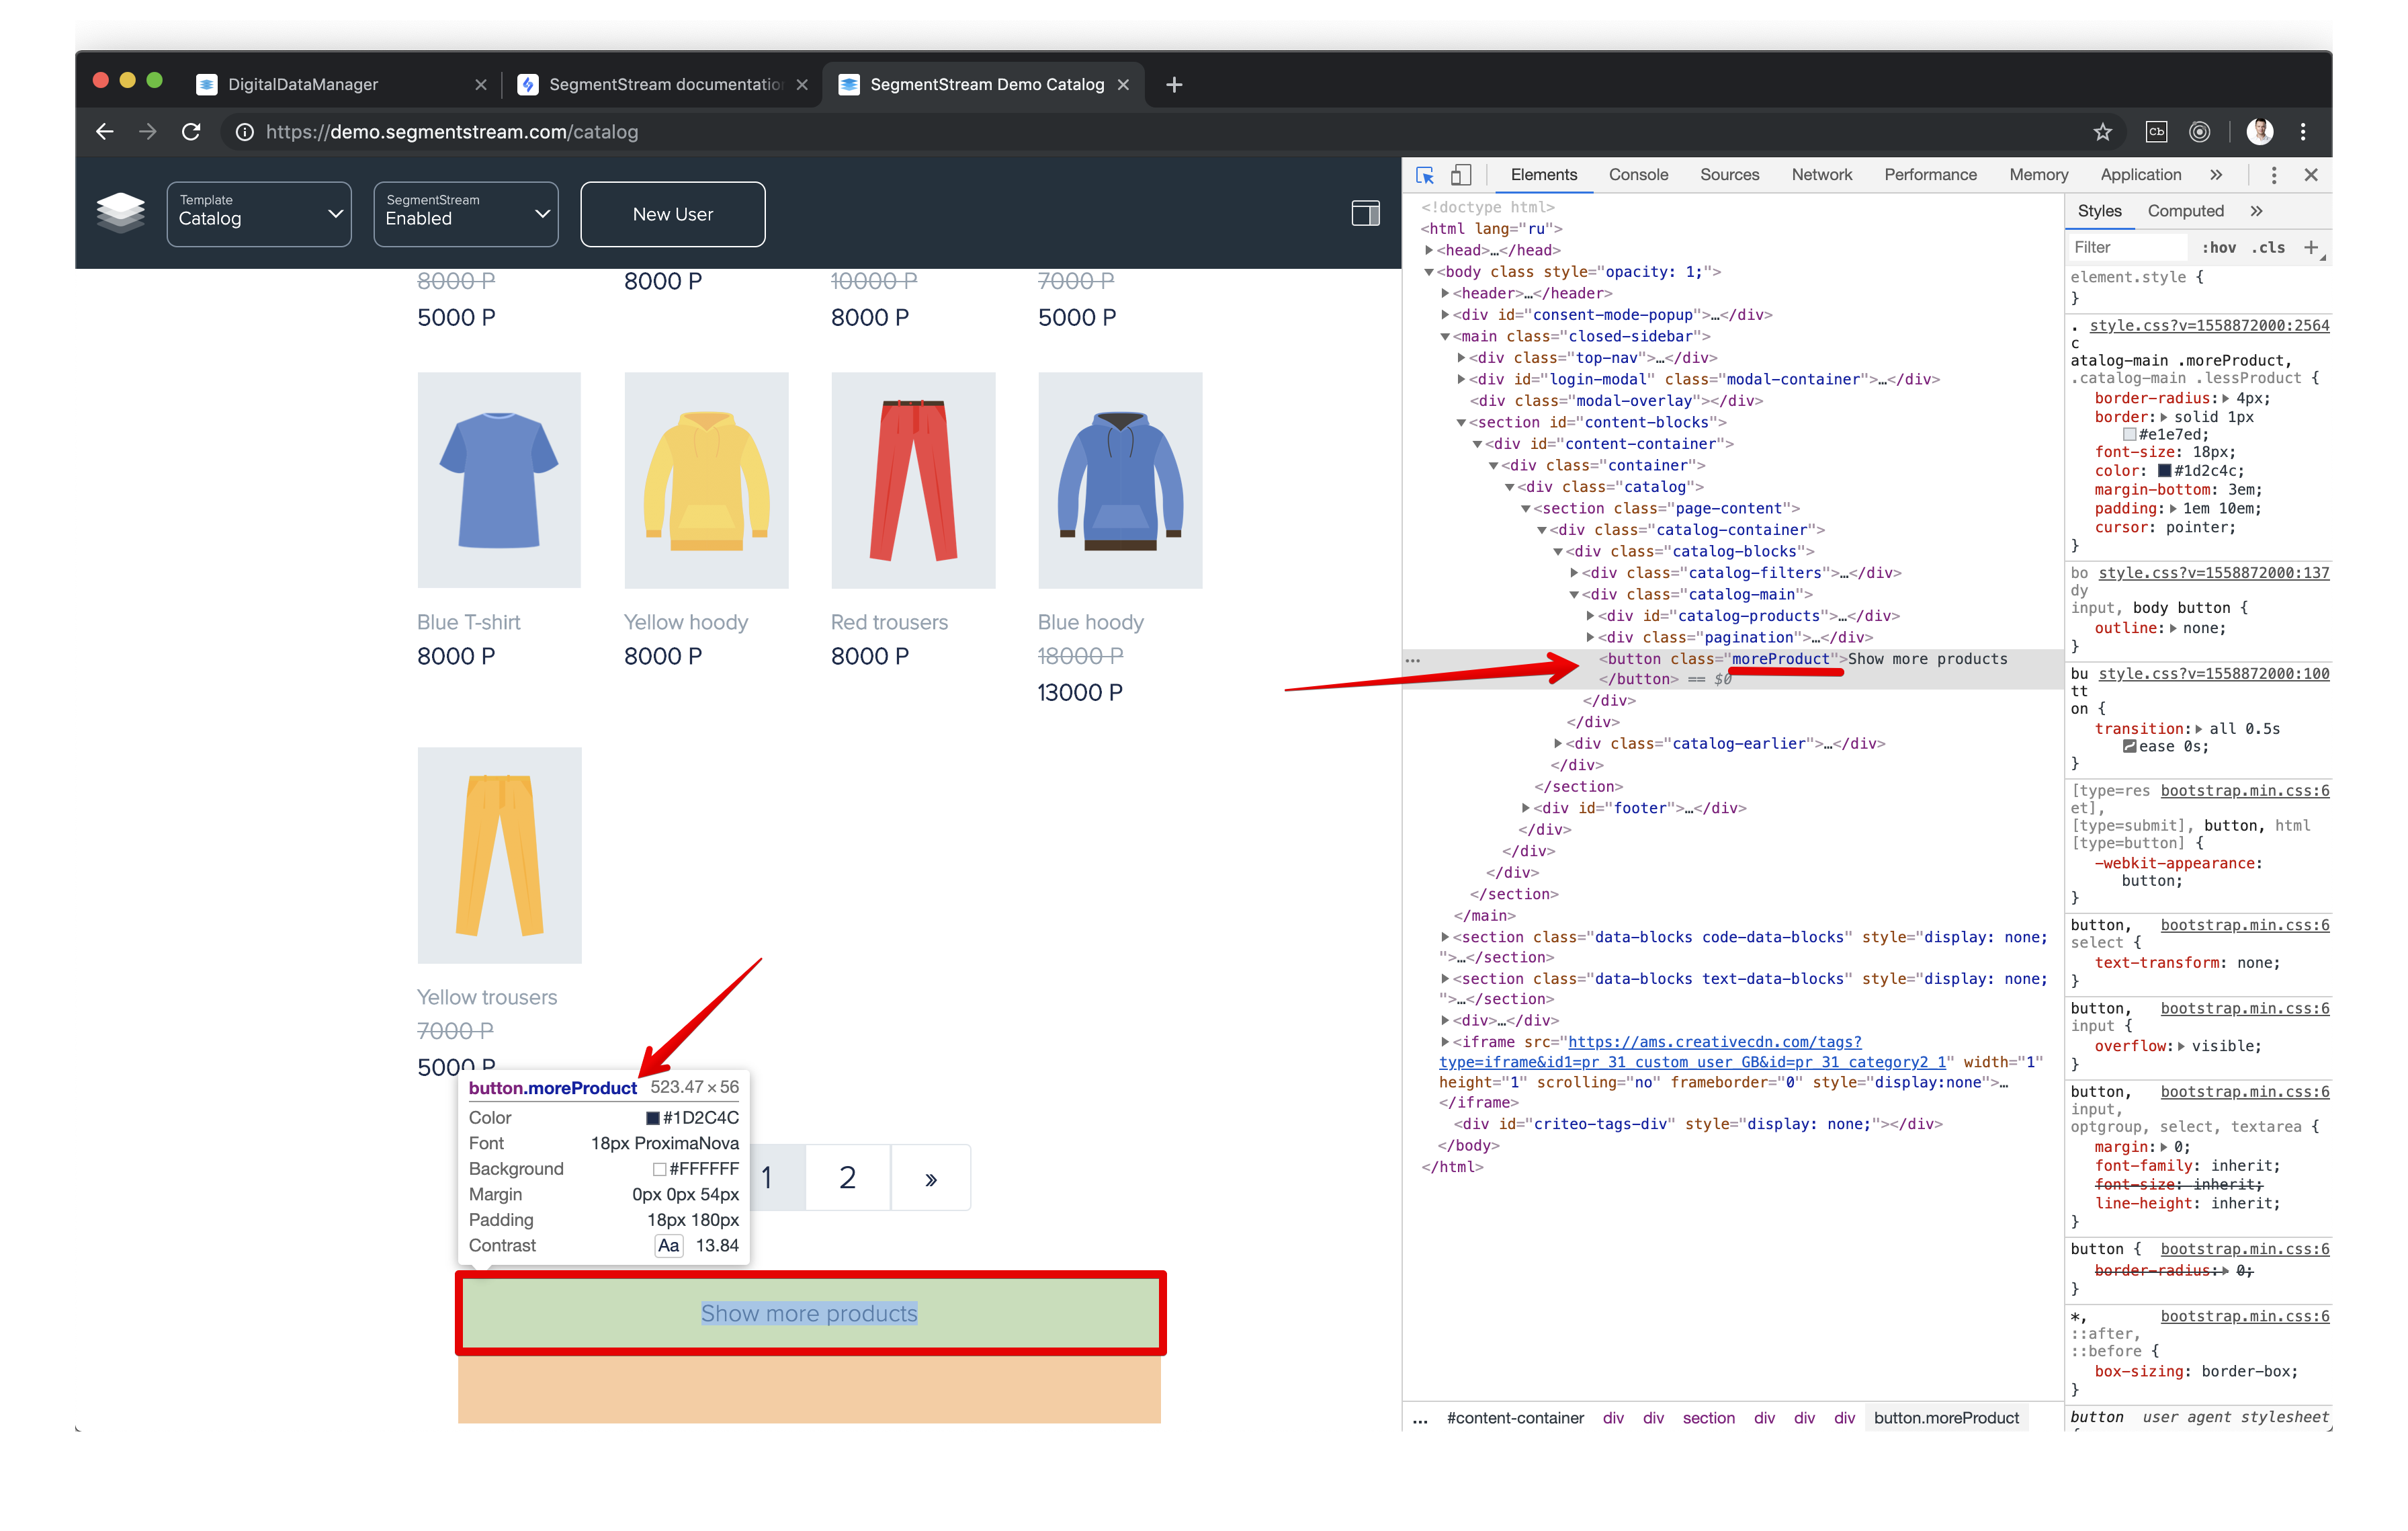 If you don’t know how to figure out a CSS selector of a specific element - ask your frontend developers.
 -
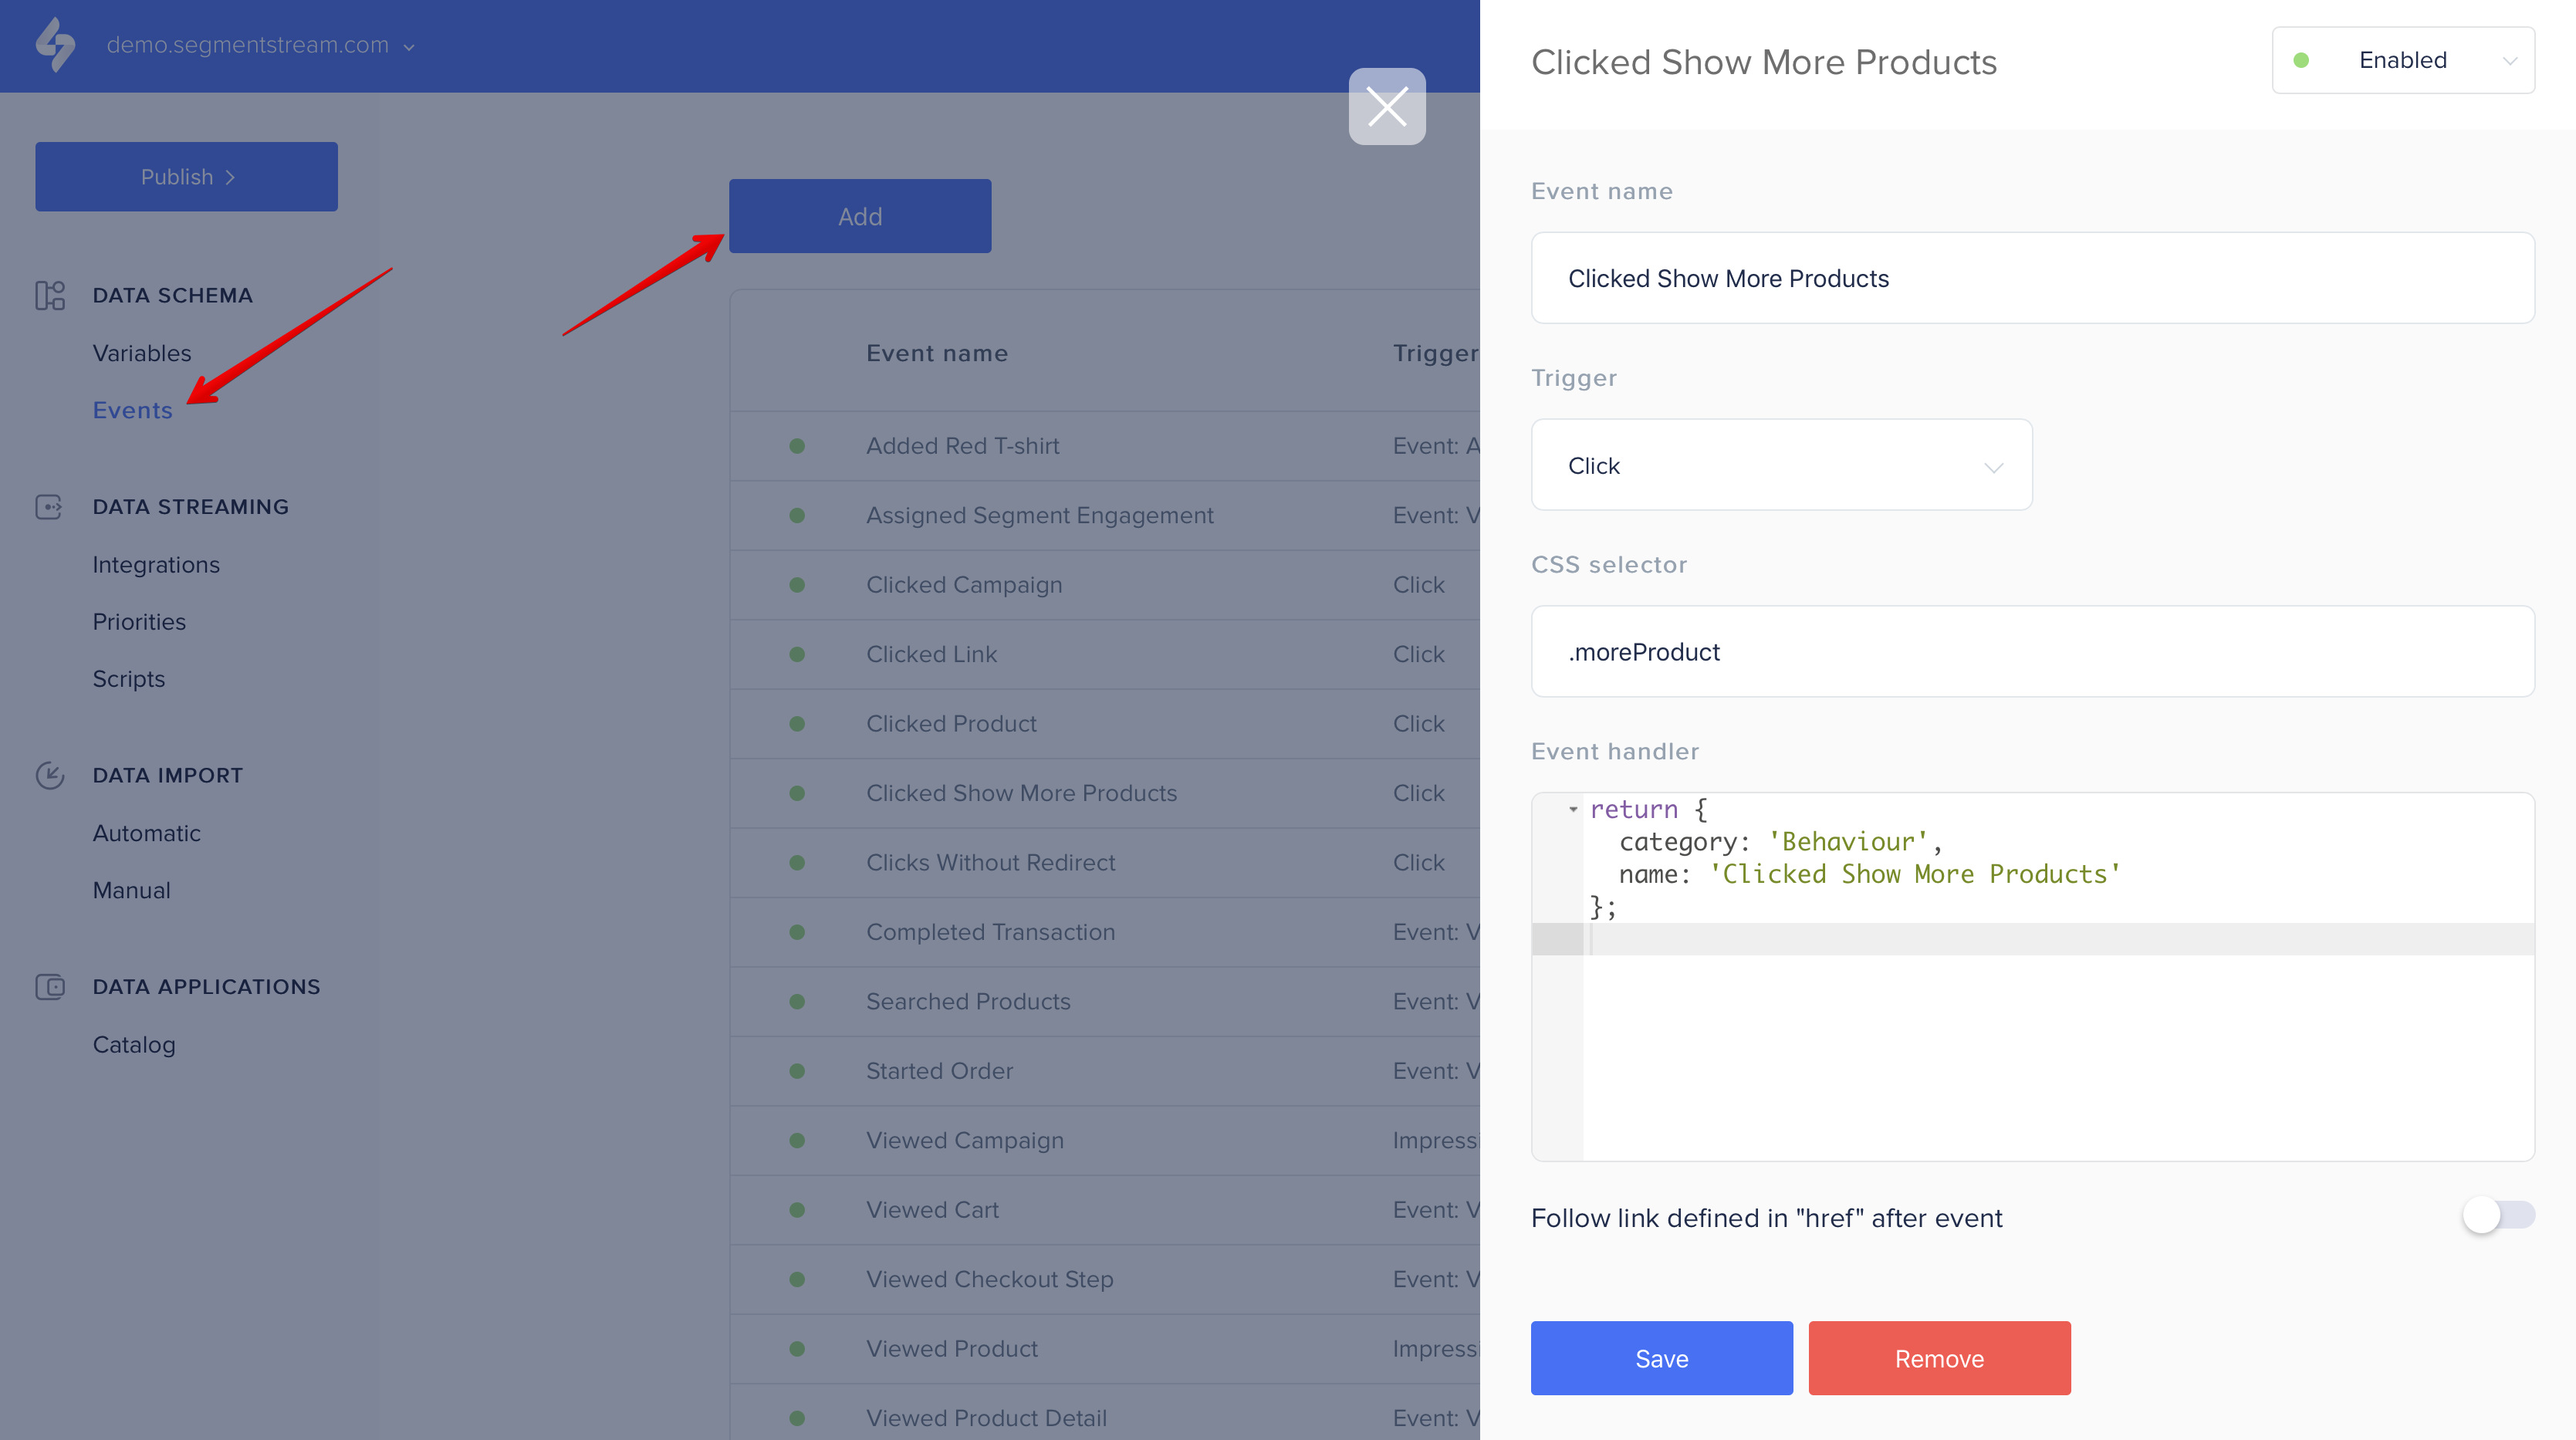
Now, go to the SegmentStream admin panel Events section and click Add button to add a new event as shown on the screen below:
-
Enter the event name.
-
Select
Clickas a trigger. -
Enter the proper CSS selector.
- Add event handler:
return { category: 'Behaviour' name: 'Clicked Button', // use your event name label: 'some label' } -
Click Save to save the event.
-
Click Publish to publish a new container (up to several minutes might be required for the changes to be propagated to the CDN server).
-
Reload your website’s page, go back to the Google Chrome’s browser console and check that your click handler is working properly:
- Go to the Google BigQuery console and query information about your click event:
SELECT
  hitId,
  event.name,
  event.category,
  event.label,
  context,
  receivedAt
FROM `<FULL_TABLE_NAME>`
WHERE event.name = "<EVENT_NAME>"
Don’t forget to replace
<FULL_TABLE_NAME>and<EVENT_NAME>with proper values.
Not you know how to setup basic events tracking and in SegmentStream and send this event to the Google BigQuery integration.
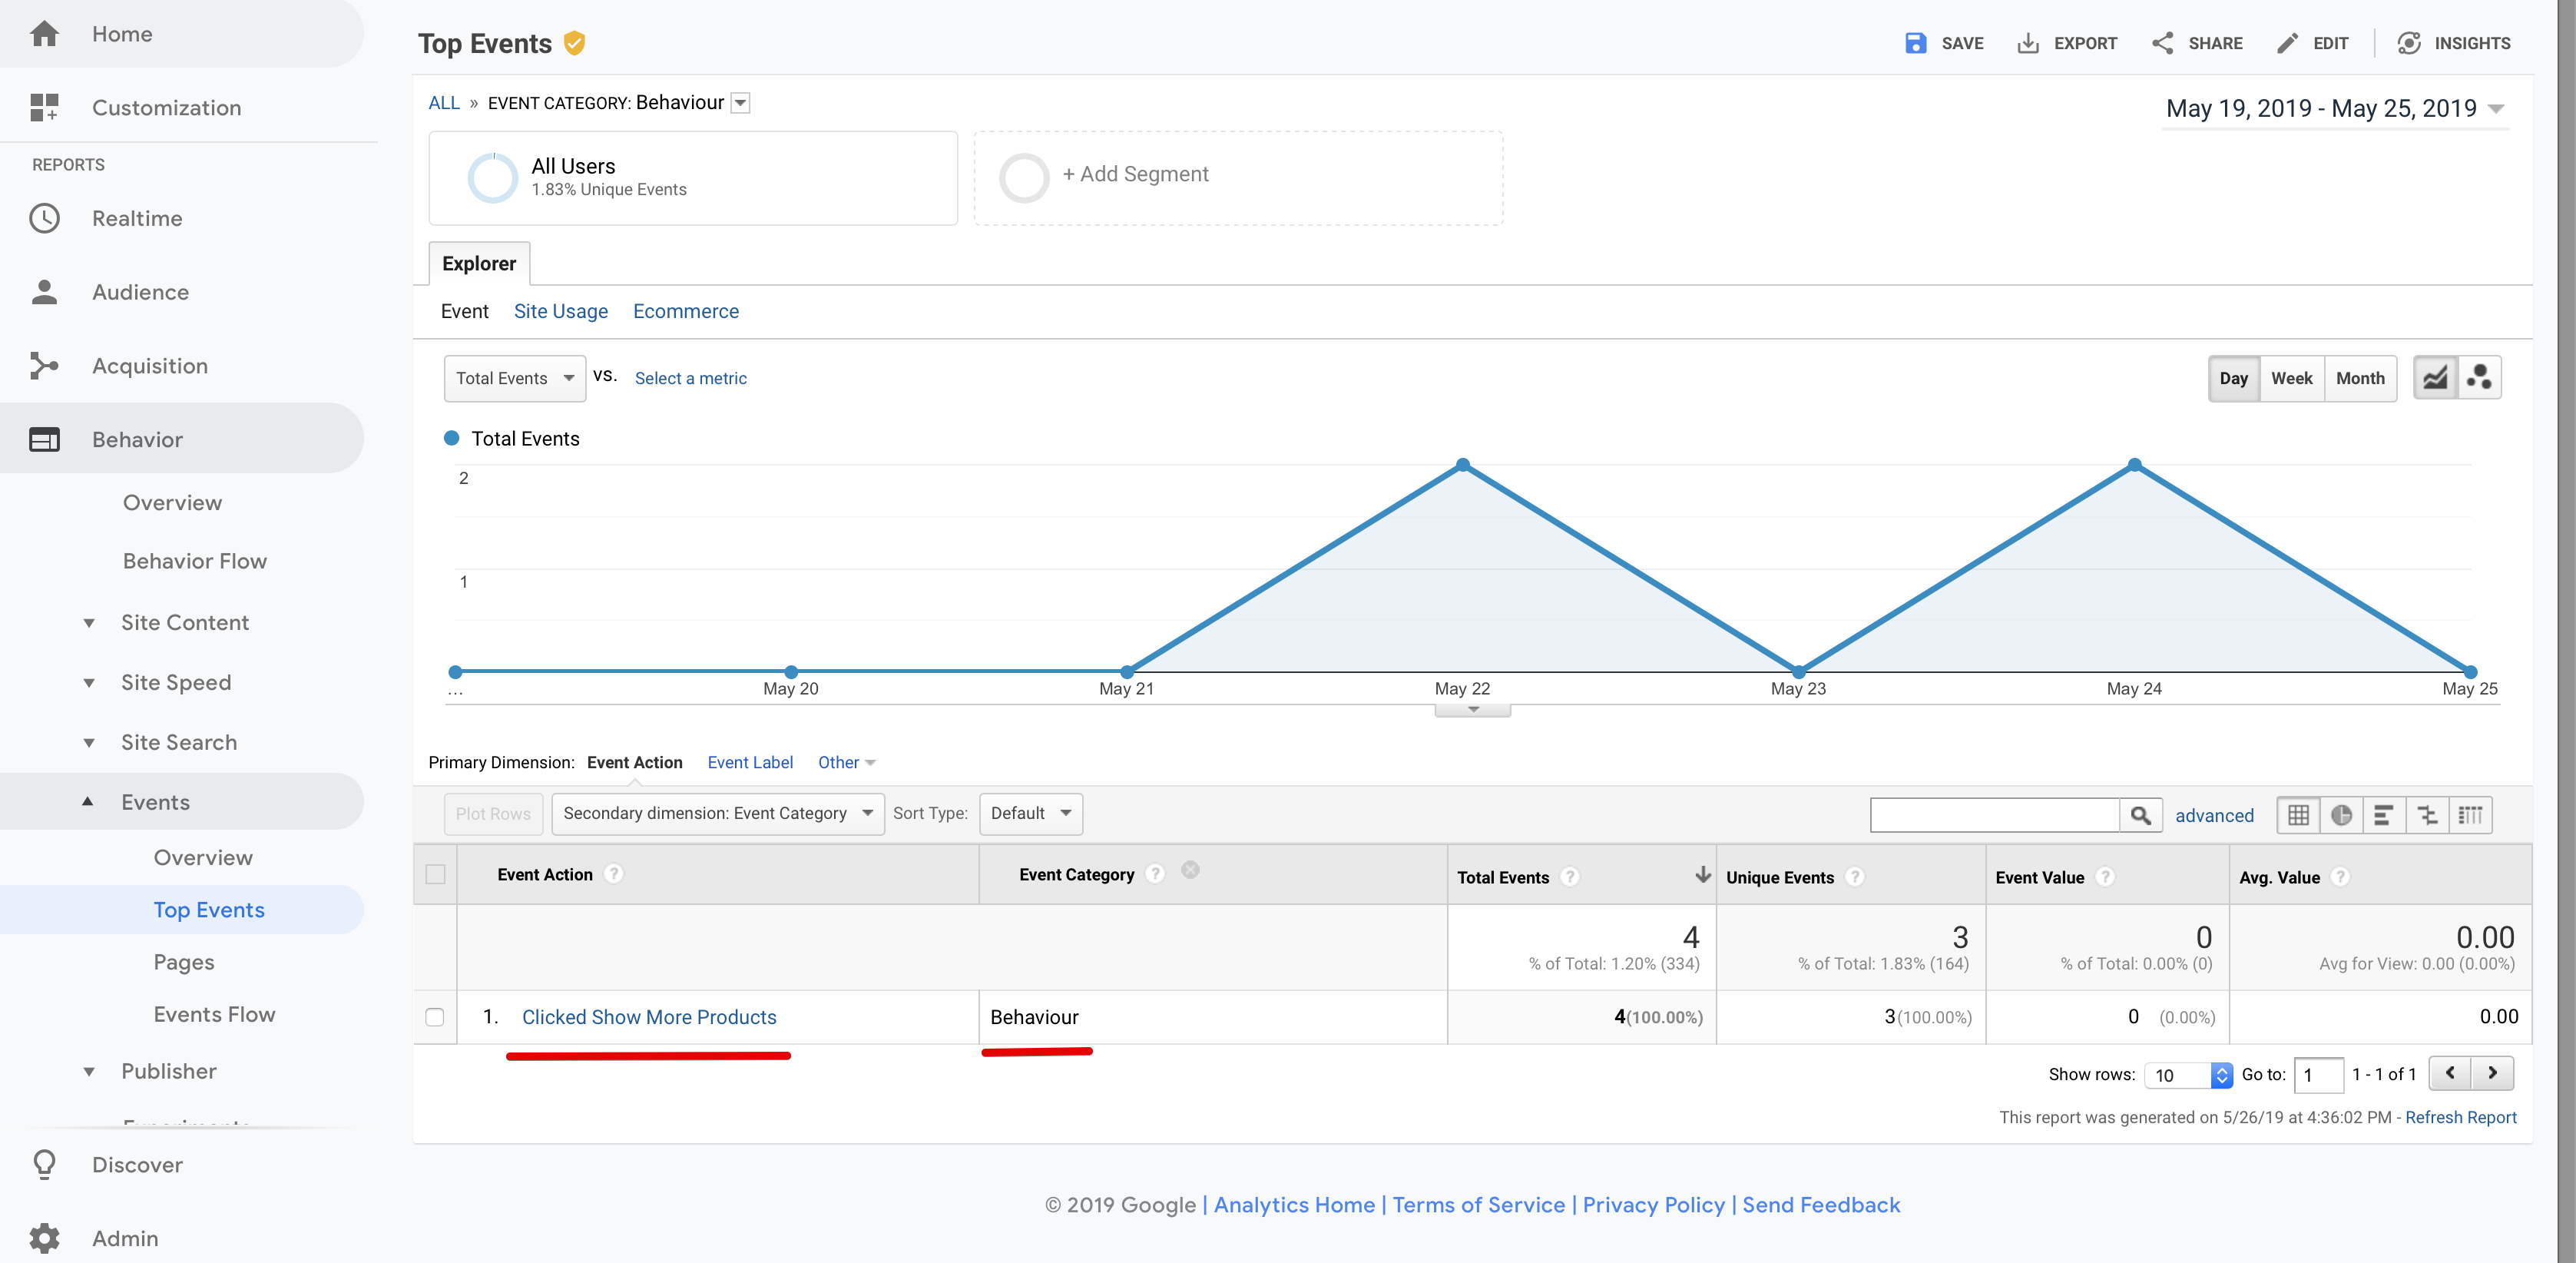
Similarly, you can connect any other integration, such as Google Analytics or Facebook. SegmentStream will automatically transform events in a proper format which each of these systems understand.
For example, this is how click event from the previous step will look like in the Google Analytics interface:
Further reading about BigQuery data import
- How to automatically import data from advertising platforms
- How to import CRM/ERP data using JSON feeds
- How to track server-side events and events from mobile apps
Other body
This document was last updated on May 26, 2019. If you notice any gaps, outdated information or simply want to leave some feedback to help us improve our documentation, please let us know!